|
|
|
AT Commander's

21st Century
HumVee
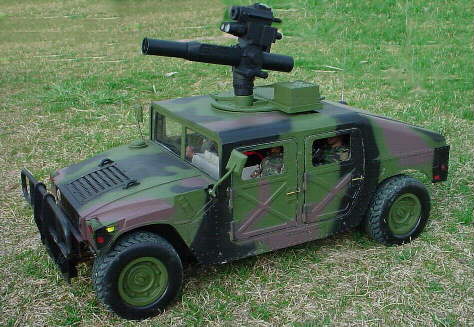
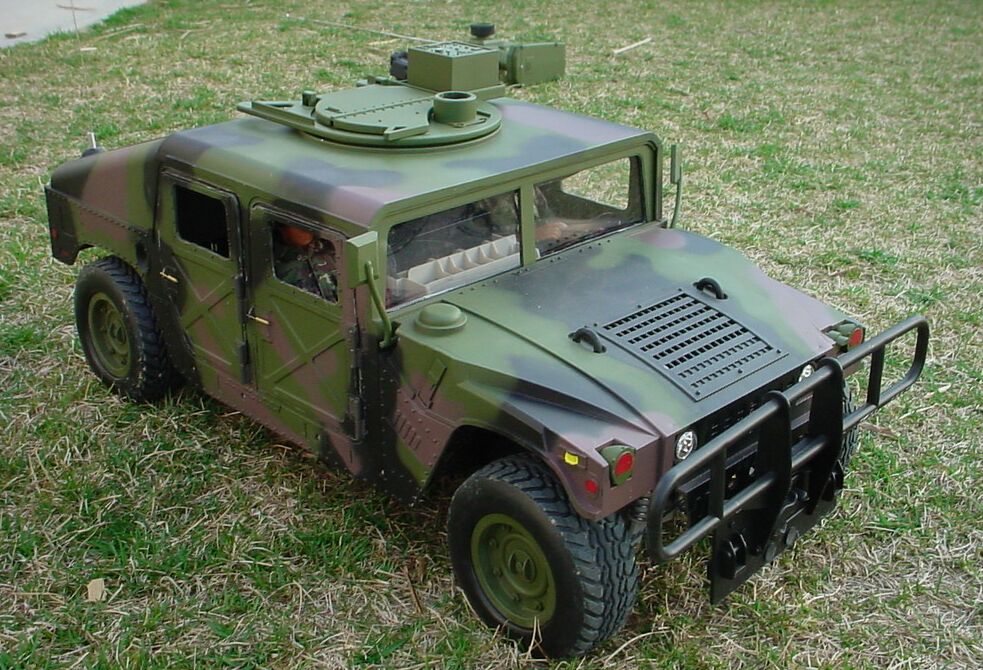
(This pic is the REAL one.)
 The
High-Mobility Multipurpose Wheeled Vehicle (HMMWV or "HumVee")
was intended to provide a common light tactical vehicle with diverse
capabilities. It was intended to replace several vehicles, such as the 1/4 ton
Jeep, the M718A1 Ambulance, the 1/2 ton Mule, the 1.25 ton Gamma Goat and the
M792 Ambulance.
The
High-Mobility Multipurpose Wheeled Vehicle (HMMWV or "HumVee")
was intended to provide a common light tactical vehicle with diverse
capabilities. It was intended to replace several vehicles, such as the 1/4 ton
Jeep, the M718A1 Ambulance, the 1/2 ton Mule, the 1.25 ton Gamma Goat and the
M792 Ambulance.

The HumVee is a very durable,
capable vehicle, especially in open areas such as the desert. Armaments are
varied from cutting-edge missile launching capabilities, to TOW launchers, and
a variety of small arms. Pics are common that show
the HumVee with M-60 and M2 machine guns in the
turret as perhaps the most common.
 It was 15 feet
long, 7.08 feet wide, 6 feet tall (redicuble to 4.5
feet), weighed 5,200 lbs, pwoered by a 6.2 liter fuel
injected liquid cooled diesel that generated 150hp at 3,600 rpms.
3-speed transmission, 2-speed locking chain-driven transfer case, 24V
electrical, could ford 2.5 feet of water (5 ft deep with fording kit), 4-wheel
disc brakes, 25 gallon fuel capacity, 65mph max speed on the highway, and a
range of up to 350 miles.
It was 15 feet
long, 7.08 feet wide, 6 feet tall (redicuble to 4.5
feet), weighed 5,200 lbs, pwoered by a 6.2 liter fuel
injected liquid cooled diesel that generated 150hp at 3,600 rpms.
3-speed transmission, 2-speed locking chain-driven transfer case, 24V
electrical, could ford 2.5 feet of water (5 ft deep with fording kit), 4-wheel
disc brakes, 25 gallon fuel capacity, 65mph max speed on the highway, and a
range of up to 350 miles.
Facts
came from an official Army site:
http://www.army.mil/fact_files_site/hmmwv/index.html
Pics came from AM General:
http://www.amgeneral.com/vehicles.php
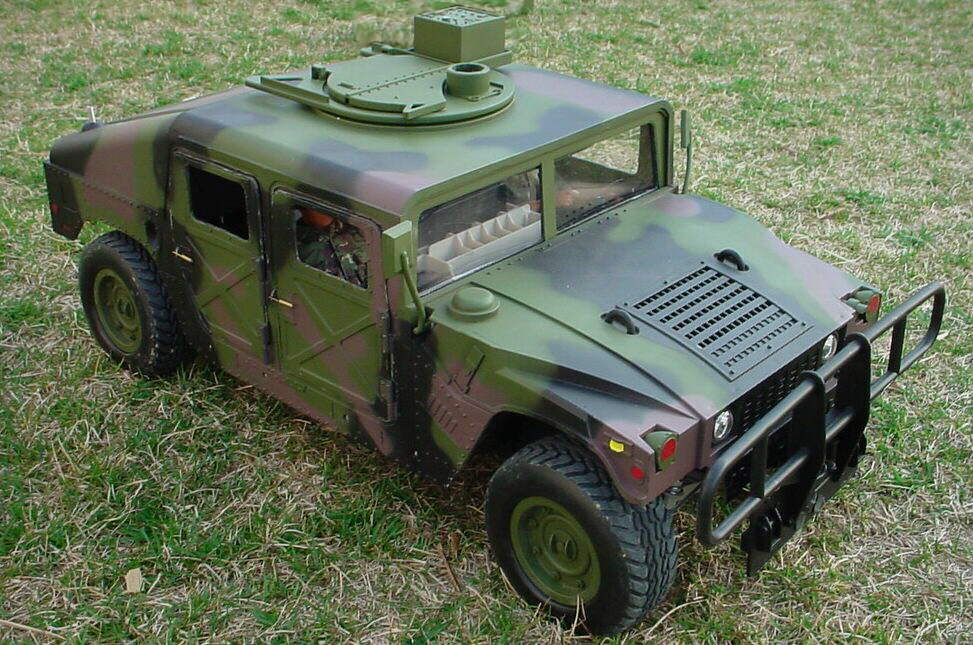
21st Century HumVee
Here is my version
of the 21st Century's HumVee. Formerly a
stock off-the-shelf forest camo version, I mae a lot of modifications. It was
a Christmas 2005 leftover that apparently never made it to the floor in time
for Christmas... it showed up on the shelf on clearance in early 2006. For the
paltry sum of $50 it seemed like a pretty good deal. The only problem was that
it wouldn't hold any 1/6 figures! This was a great scale version of the HumVee, but it obviously needed some work...
This Web Page is an effort to explain what I've done and how I
did it. Here is a list of the modifications I made to the vehicle:
- Windshield Glass Added
- Door Hinges Added
- Door Latches Added
- Interior Added (4 seats)
- Seatbelts (in front 2 seats)
- Dashboard Added (on driver's side)
- Steering Wheel Fabricated and Added
- Antenna Modifications
Chassis:
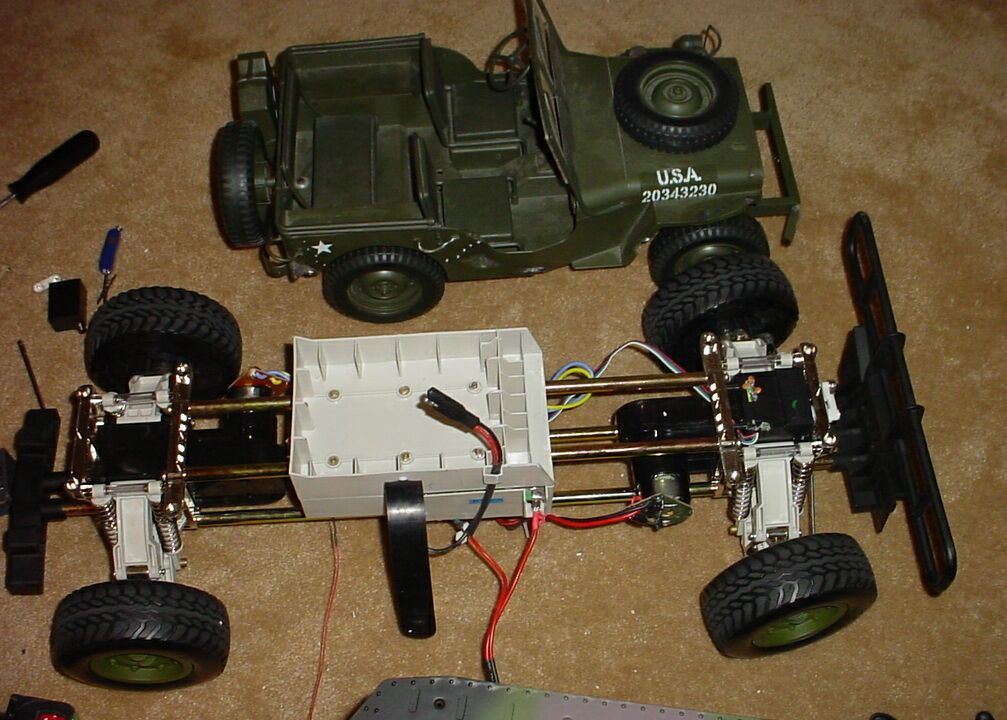 The chassis for this HumVee is pretty robust. Whoever designed it made sure it'd
handle some rough use! As you can see from the pic,
it's based upon a 4-element frame that bolts to the engines front and rear. On
the middle of the frame you can see the radio box (the white rectangular box).
The chassis for this HumVee is pretty robust. Whoever designed it made sure it'd
handle some rough use! As you can see from the pic,
it's based upon a 4-element frame that bolts to the engines front and rear. On
the middle of the frame you can see the radio box (the white rectangular box).
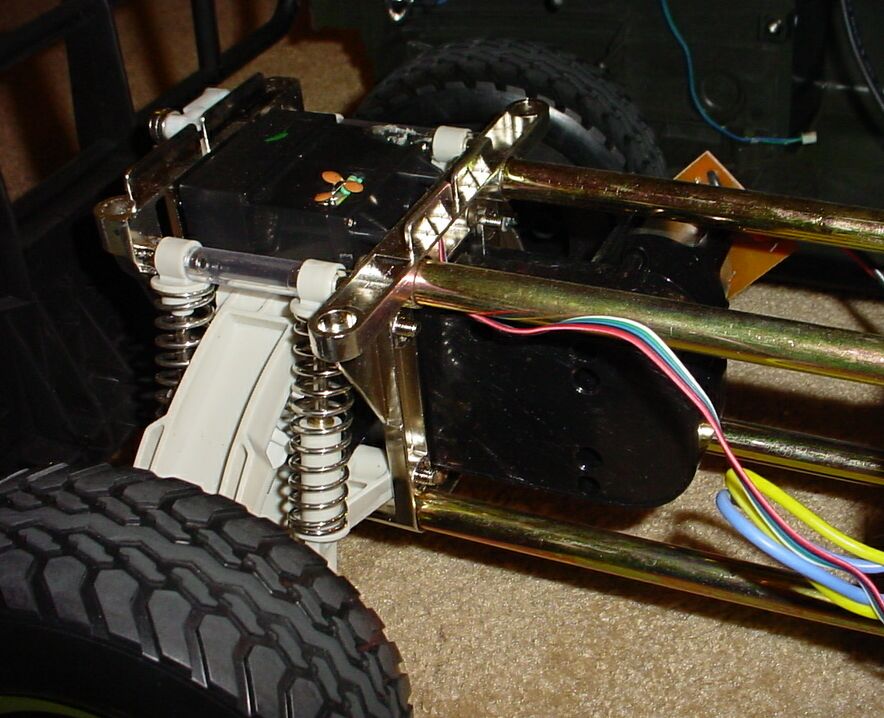 Here's a pic of the motor drive to a wheel pair. There are two
essentially identical motor drives, one for the steerable
front wheels and one for the fixed rear wheels. Yup, it's a no-kiddin' 4-wheel drive design! We (the kids and I) tried
this on a variety of obstacles and terrain, and we were pretty impressed with
the performance of this platform! I'm kicking myself for not picking up another
one while they were on clearance, so I'd be able to use one for spare parts and
perhaps 'bash a custom 6x6 armored car (M-8 Greyhound,
perhaps?). I've had many "kick myself later" episodes, though, so I'm
getting used to it. Rugged design is evident here - I'm impressed!
Here's a pic of the motor drive to a wheel pair. There are two
essentially identical motor drives, one for the steerable
front wheels and one for the fixed rear wheels. Yup, it's a no-kiddin' 4-wheel drive design! We (the kids and I) tried
this on a variety of obstacles and terrain, and we were pretty impressed with
the performance of this platform! I'm kicking myself for not picking up another
one while they were on clearance, so I'd be able to use one for spare parts and
perhaps 'bash a custom 6x6 armored car (M-8 Greyhound,
perhaps?). I've had many "kick myself later" episodes, though, so I'm
getting used to it. Rugged design is evident here - I'm impressed!
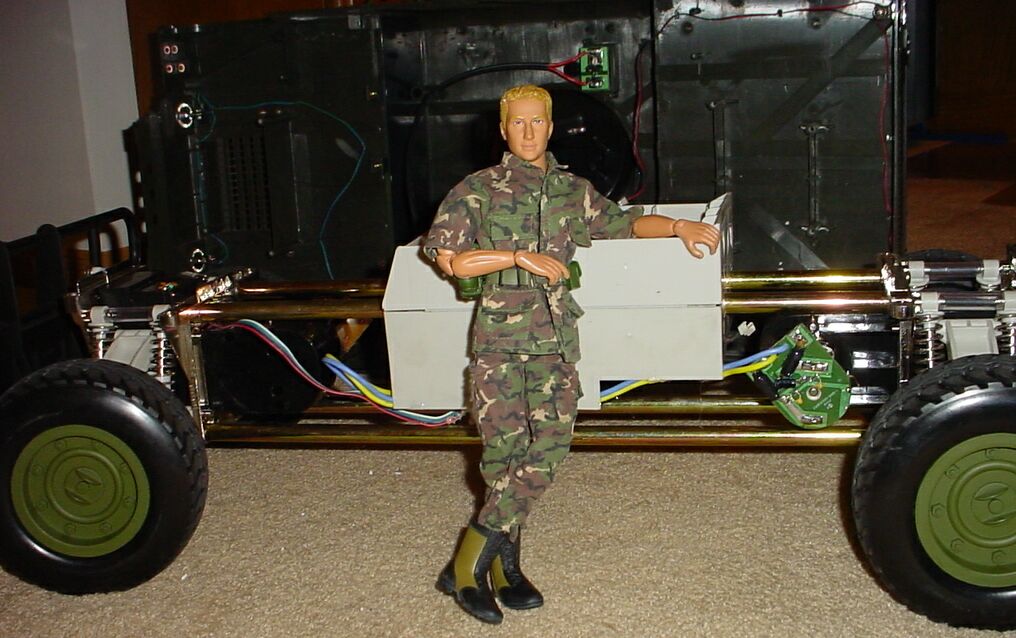 Ultimate-Elite-Whatever-Brand
this guy is shows the comparative size of this chassis with a figure as
reference. You can see that it's got pretty reasonable ground clearance.
"Real" Joes can't sit worth beans, and I didn't have any spare SA
Joes around, so this generic guy and a Max Steel out
of the junkbox comprise the 2-man crew.
Ultimate-Elite-Whatever-Brand
this guy is shows the comparative size of this chassis with a figure as
reference. You can see that it's got pretty reasonable ground clearance.
"Real" Joes can't sit worth beans, and I didn't have any spare SA
Joes around, so this generic guy and a Max Steel out
of the junkbox comprise the 2-man crew.
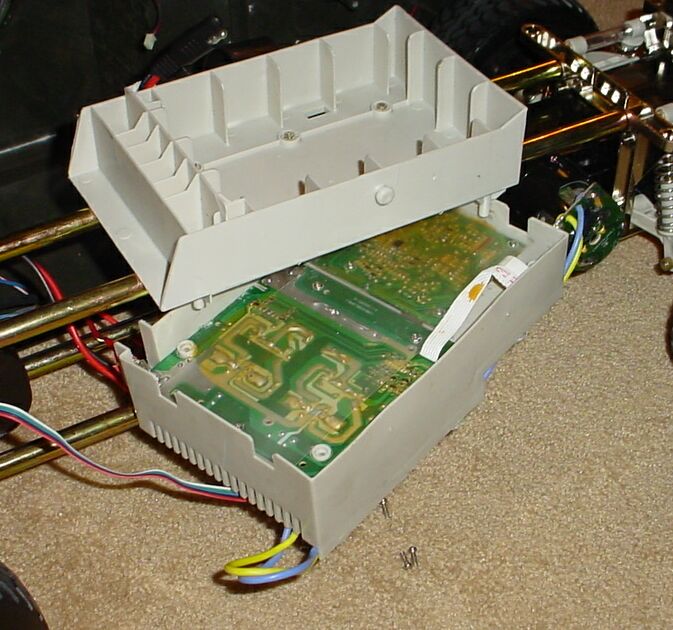 This is a close-up shot
of the radio box. I unscrewed it from the chassis to see how it was mounted.
You can see from the pic here that the top of the
radio box (the battery tray) is bolted
This is a close-up shot
of the radio box. I unscrewed it from the chassis to see how it was mounted.
You can see from the pic here that the top of the
radio box (the battery tray) is bolted 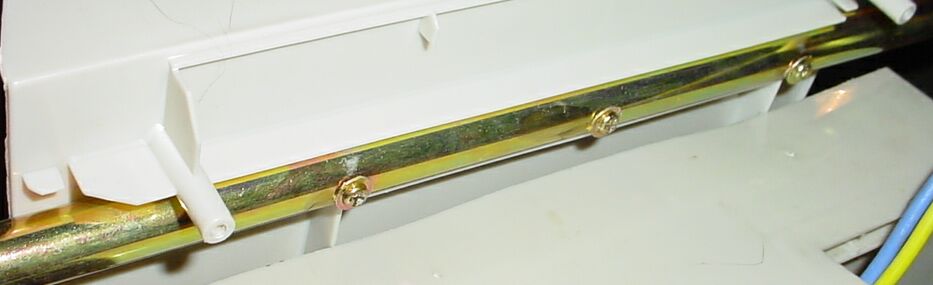 pretty sturdily to the
chassis. The bottom of the radio box is bolted up, onto the battery tray. This
looked like it could be moved for other designs, perhaps (like an M-8 with an
open fighting compartment), but since I wanted to go with a HumVee,
I figured I'd leave it where it is... now I know how it's constructed and can
better plan for other projects and can move it later if I feel like it.
pretty sturdily to the
chassis. The bottom of the radio box is bolted up, onto the battery tray. This
looked like it could be moved for other designs, perhaps (like an M-8 with an
open fighting compartment), but since I wanted to go with a HumVee,
I figured I'd leave it where it is... now I know how it's constructed and can
better plan for other projects and can move it later if I feel like it.
Windshield:
After turning the body upside-down, I saw that the windshield was held on my
just a few screws. 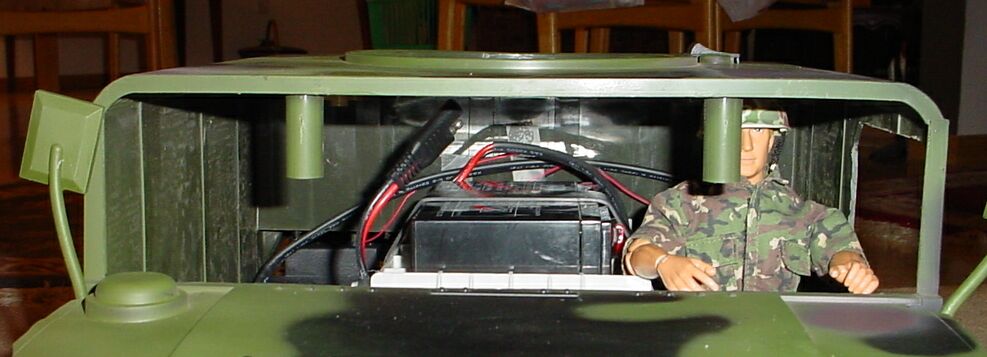
 slotted into place on
the sides, and the screws hold it at the bottom, where the dash would be).
After removing the windshield, you can see the terrible pillars that hang from
the roof behind the windshield. Obviously, these have got to go! The Dremel tool (with a buzz-saw attachment) made short work of
'em!
slotted into place on
the sides, and the screws hold it at the bottom, where the dash would be).
After removing the windshield, you can see the terrible pillars that hang from
the roof behind the windshield. Obviously, these have got to go! The Dremel tool (with a buzz-saw attachment) made short work of
'em!
Door
Hinges:
You can see the hinges I fabricated in this photo. I originally used the inner
lead tube from a disposable mechanical pencil, but 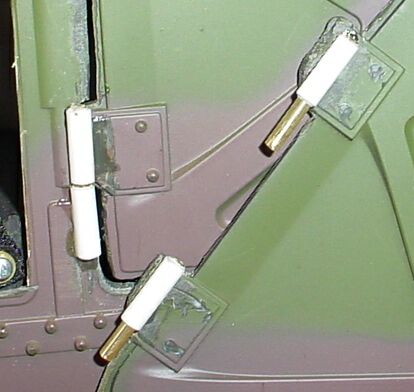
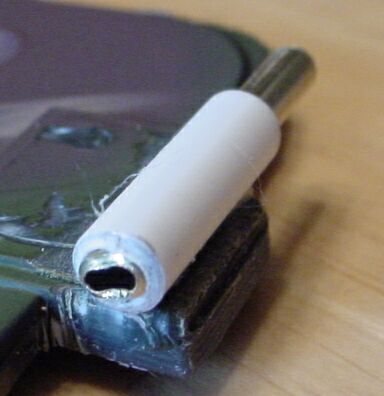 ought to use styrene
tubing from the hobby store instead (my wife got mad when I started breaking
pencils "but honey, this little plastic tube is PERFECT!!!"). After
cutting out the doors, I added the "tubing hinges" to the body and to
the doors. Then I found some brass tubing that was exactly the same size as the
inner diameter of the tubing. You can see from the little pic
that I dinged one end of the tubing to force it out-of-round... that way it
would friction-fit into the tubing (in other words, I bashed it with a ball
peen hammer to slightly flatten one end of the brass tube, then crammed it into
the soft styrene tubing so it'd stay put). Just in case, I added a drop or two
of Epoxy to the top of each to be sure it'd stay put and to make the top of the
hinge rounded.
ought to use styrene
tubing from the hobby store instead (my wife got mad when I started breaking
pencils "but honey, this little plastic tube is PERFECT!!!"). After
cutting out the doors, I added the "tubing hinges" to the body and to
the doors. Then I found some brass tubing that was exactly the same size as the
inner diameter of the tubing. You can see from the little pic
that I dinged one end of the tubing to force it out-of-round... that way it
would friction-fit into the tubing (in other words, I bashed it with a ball
peen hammer to slightly flatten one end of the brass tube, then crammed it into
the soft styrene tubing so it'd stay put). Just in case, I added a drop or two
of Epoxy to the top of each to be sure it'd stay put and to make the top of the
hinge rounded.
Here's a pic of one of the hinges -
it's pulled up a little for the pic to show you the
brass tubing inside the styrene. Yes, the doors are removable, just like on a
real HumVee. On 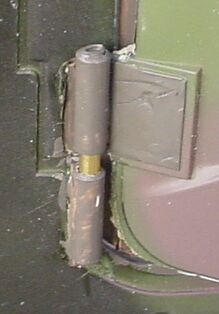 a small sailboat's rudder,
it's called a "pintle and gudgeon"
arrangement. I also included a (rather ugly) pic of
the hinges at one phase of development, but I
a small sailboat's rudder,
it's called a "pintle and gudgeon"
arrangement. I also included a (rather ugly) pic of
the hinges at one phase of development, but I 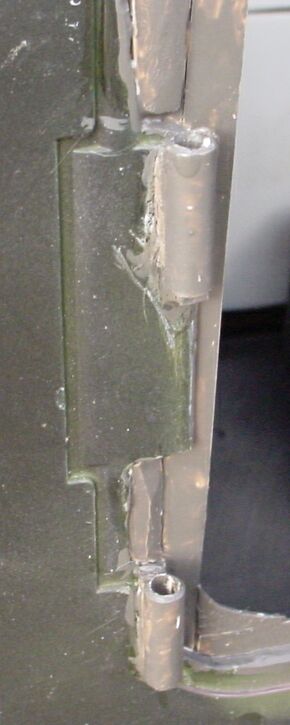 included this pic to show the door liner rather than the hinges
themselves. You can see that I put a strip of sheet styrene around the door
opening on the inside. This gives the door something to support it (or
"close against") when the door is shut. Without something there, the
door would swing into the opening and keep right on swinging... since the door
is a cutout, there is a blade-width space all the way around the door and it'd
"over-close" without something to slam against and hold it in place.
Here you can see a sloppy first coat of paint. It'll get another coat of paint
that'll deepen the green and even it up. I'll do a little work with putty, too,
to clean up some of the irregular gouges from the door-cutting process. Still,
it gives you an idea of what you're up against with this kind of project.
Cutting doors out is only one step... the quickest, easiest, most fun step.
Adding the door jamb, building up the hinges with sheet plastic so that they
perfectly meet, and aligning stuff is a lot harder than the fun of weilding a Dremel buzz saw for 10
minutes. Then comes the putty and paint (the part I
like the least!). These are pre-putty and paint pics.
included this pic to show the door liner rather than the hinges
themselves. You can see that I put a strip of sheet styrene around the door
opening on the inside. This gives the door something to support it (or
"close against") when the door is shut. Without something there, the
door would swing into the opening and keep right on swinging... since the door
is a cutout, there is a blade-width space all the way around the door and it'd
"over-close" without something to slam against and hold it in place.
Here you can see a sloppy first coat of paint. It'll get another coat of paint
that'll deepen the green and even it up. I'll do a little work with putty, too,
to clean up some of the irregular gouges from the door-cutting process. Still,
it gives you an idea of what you're up against with this kind of project.
Cutting doors out is only one step... the quickest, easiest, most fun step.
Adding the door jamb, building up the hinges with sheet plastic so that they
perfectly meet, and aligning stuff is a lot harder than the fun of weilding a Dremel buzz saw for 10
minutes. Then comes the putty and paint (the part I
like the least!). These are pre-putty and paint pics.
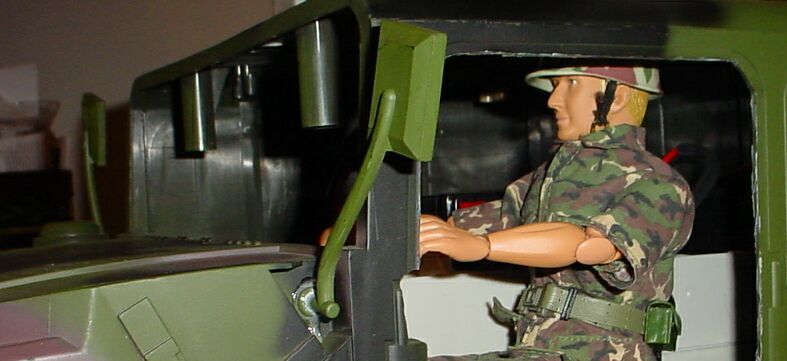
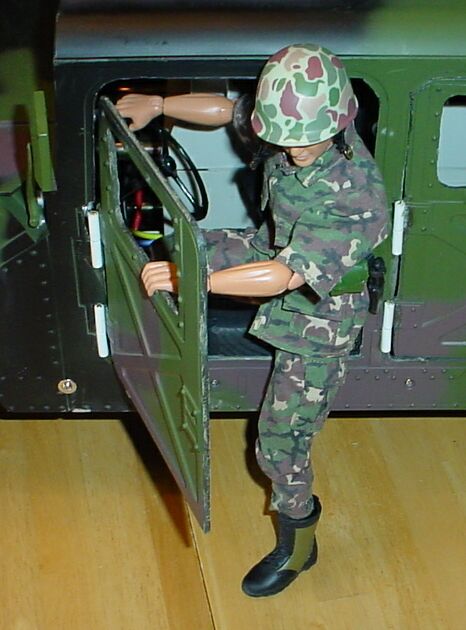 Here's a pic of HumVee Driver trying out
the new doors. At this phase I'd just put in the interior and steering wheel
and was working on the hinges. Because of the coutours
of the HumVee body, some hinges needed a thin strip
of sheet styrene mounted beneath them to align them with the hinge half that
I'd already mounted on the door. This pic was taken
the evening I was testing the hinges. I had to cut off hinges a few times and
remanufacture them because I wasn't happy with the alignment. I made a boatload
of hinges until I got them all aligned and matched up so that I was happy with
'em. I wanted the doors to swing easily, with very
little resistance; at the same time, I wanted the doors to be easily removable.
I had in mind that my 8-year old would be doing this without supervision, and
I'd rather build it right the first time than repeatedly repair it! (Note that
in this pic I hadn't yet added the thin strip of
sheet plastic interior of the door opening to give it a door jamb (something to
close against, that I described earlier).
Here's a pic of HumVee Driver trying out
the new doors. At this phase I'd just put in the interior and steering wheel
and was working on the hinges. Because of the coutours
of the HumVee body, some hinges needed a thin strip
of sheet styrene mounted beneath them to align them with the hinge half that
I'd already mounted on the door. This pic was taken
the evening I was testing the hinges. I had to cut off hinges a few times and
remanufacture them because I wasn't happy with the alignment. I made a boatload
of hinges until I got them all aligned and matched up so that I was happy with
'em. I wanted the doors to swing easily, with very
little resistance; at the same time, I wanted the doors to be easily removable.
I had in mind that my 8-year old would be doing this without supervision, and
I'd rather build it right the first time than repeatedly repair it! (Note that
in this pic I hadn't yet added the thin strip of
sheet plastic interior of the door opening to give it a door jamb (something to
close against, that I described earlier).
Door Handles/Latches:

 pressure-fit over the
tall part of
pressure-fit over the
tall part of
Interior:
The
interior isn't really an interior… the phrase gives it more credit than is due.
I cut a 2x4 on my tablesaw a 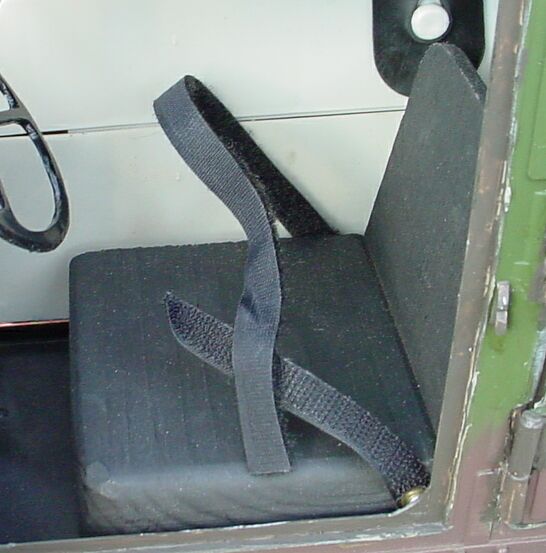 couple of times until I
got it the height I wanted, then I buzzed it with my
bench-mount belt sander to round the edges. This took all of about 2 minutes.
You can see from the pic that I didn't so a very
careful job of rounding the edges or anything fancy. I cut the back of the
"seat cushion" at an angle, and mounted the seatback with a couple of
screws. The seatback is a scrap of wallboard or Masonite
that I had kicking around. I got a strip of Velcro from my seamstress wife and
split it so it'd be belt-width for a Joe and put a screw through it on each
side of the seat - it made a quick and easy seat belt! In this pic you can see the jamb put around the inside of the door
frame, and you can see the edge of the screw and washer that's holding the
seatbelt in. The seat was ultimately screwed down onto the floorboards of the HumVee (I put a couple of screws up from underneath). There
were some little irregularities in the floorboards (where body screws matched
the floorboards), so I had to drill or carve out little spots here and there to
make them fit. I seem to recall a lump where the front and rear floorboards
snapped together, too, but I just used a narrow chisel to make room for it
under the seat. Basically, make the seat then hand-fit it by fiddling around.
couple of times until I
got it the height I wanted, then I buzzed it with my
bench-mount belt sander to round the edges. This took all of about 2 minutes.
You can see from the pic that I didn't so a very
careful job of rounding the edges or anything fancy. I cut the back of the
"seat cushion" at an angle, and mounted the seatback with a couple of
screws. The seatback is a scrap of wallboard or Masonite
that I had kicking around. I got a strip of Velcro from my seamstress wife and
split it so it'd be belt-width for a Joe and put a screw through it on each
side of the seat - it made a quick and easy seat belt! In this pic you can see the jamb put around the inside of the door
frame, and you can see the edge of the screw and washer that's holding the
seatbelt in. The seat was ultimately screwed down onto the floorboards of the HumVee (I put a couple of screws up from underneath). There
were some little irregularities in the floorboards (where body screws matched
the floorboards), so I had to drill or carve out little spots here and there to
make them fit. I seem to recall a lump where the front and rear floorboards
snapped together, too, but I just used a narrow chisel to make room for it
under the seat. Basically, make the seat then hand-fit it by fiddling around.
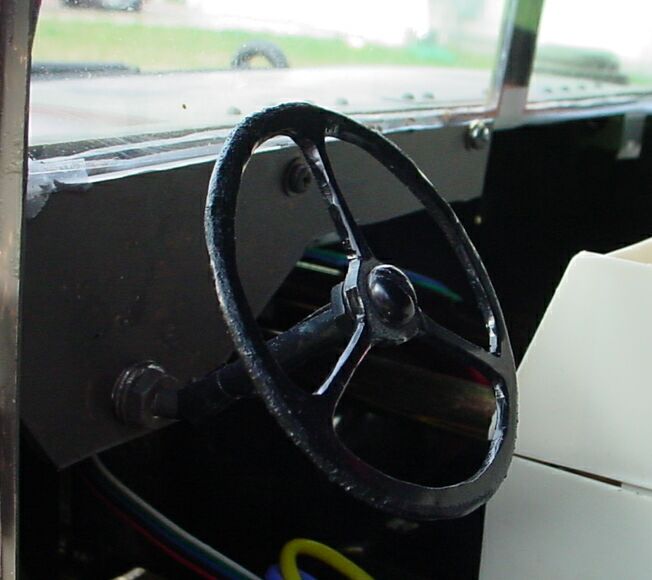 Here's the dash and
steering wheel I added. The dash is just a scrap of sheet plastic that I bolted
to the backside
Here's the dash and
steering wheel I added. The dash is just a scrap of sheet plastic that I bolted
to the backside
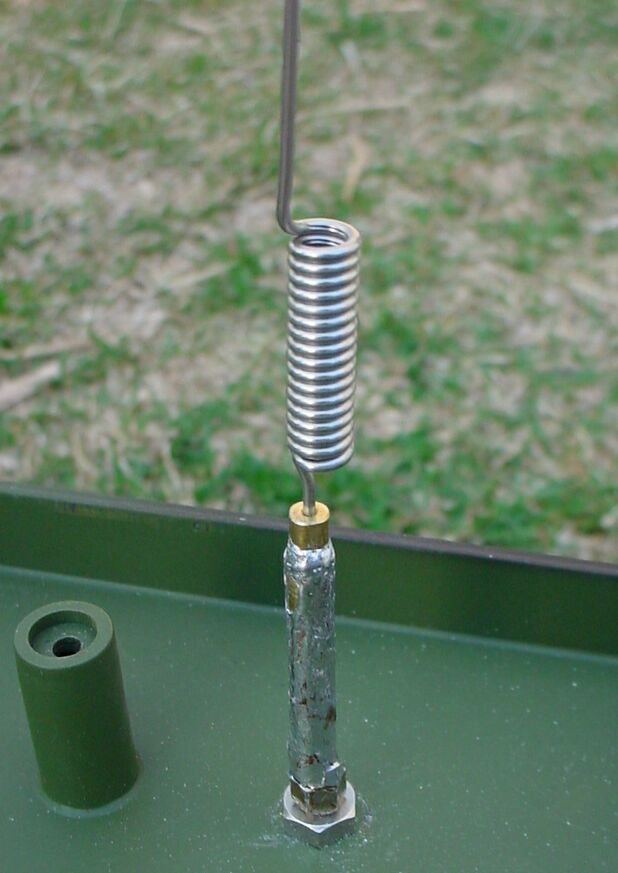
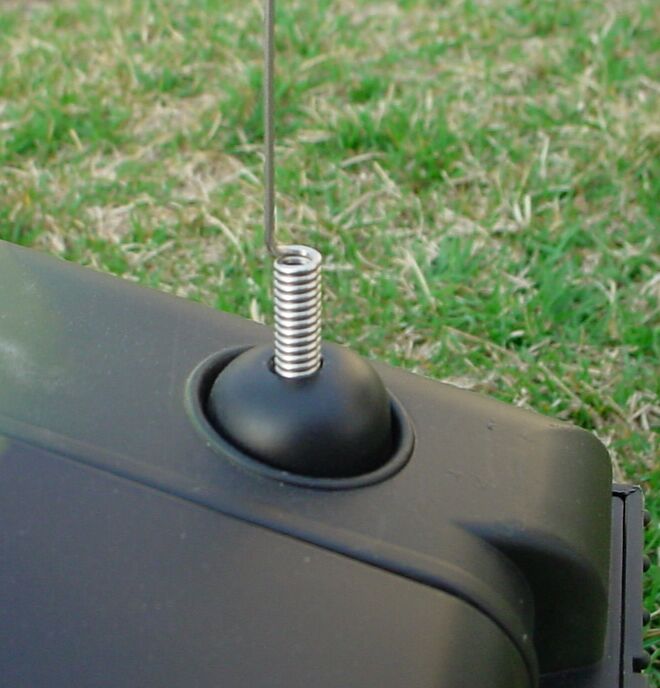
Antenna Modifications:
The
antenna presented a special kind of problem. The antenna screwed into a little
plate mounted on the body, from underneath. I 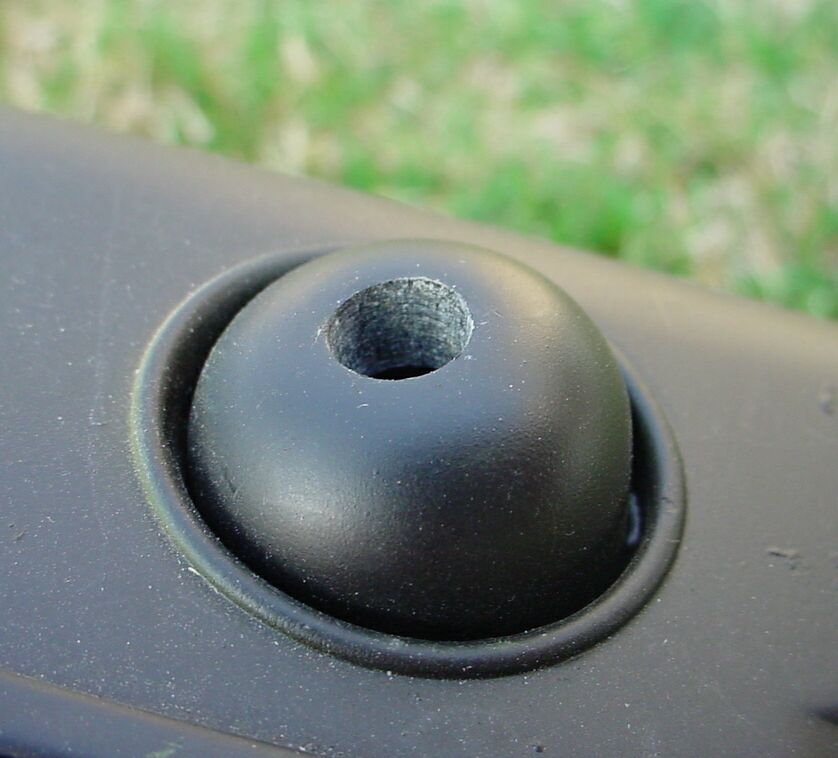
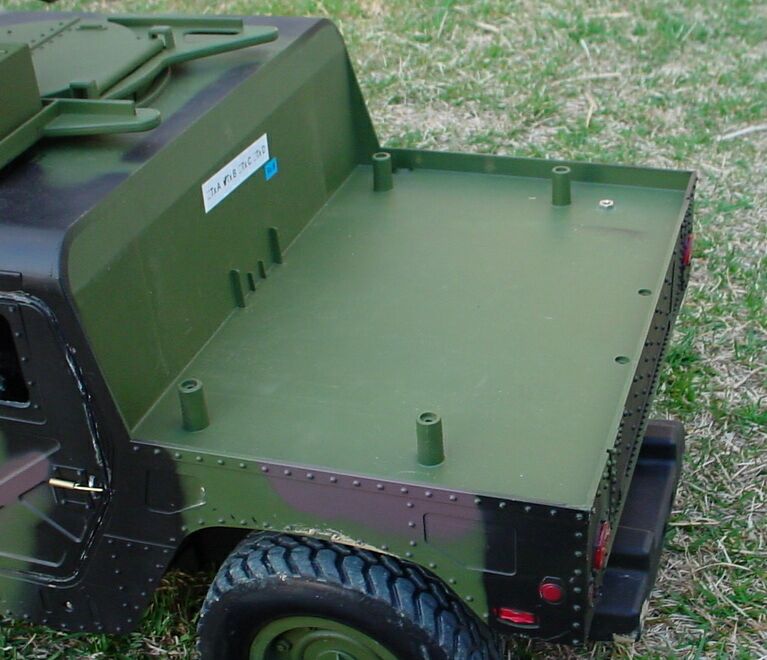 Here you can see the flat
pickup-like rear end that's underneath the slanted rear end on this HumVee. There are 4 mounting points that are clearly
visible, and if you look closely at the top right, you can see the nut that
holds the banana socket in place. This wide-open platform looks like a great
place for a gazillion possibilities. On those four mounting screws you could
put a rocket launcher, searchlight platform, video camera, etc, etc, etc… there
are so many cool things you could do with this it's incredible! (I'd explore a
few of 'em if I didn't already have my NEXT project
in mind! ;-)
Here you can see the flat
pickup-like rear end that's underneath the slanted rear end on this HumVee. There are 4 mounting points that are clearly
visible, and if you look closely at the top right, you can see the nut that
holds the banana socket in place. This wide-open platform looks like a great
place for a gazillion possibilities. On those four mounting screws you could
put a rocket launcher, searchlight platform, video camera, etc, etc, etc… there
are so many cool things you could do with this it's incredible! (I'd explore a
few of 'em if I didn't already have my NEXT project
in mind! ;-)
 Conclusion:
The HumVee looks a lot better with the windows and windshield
cut out. Of course, cutting out the windows and windshield means you'd need to put
some figures in there… that means an interior (seats, at least). If you're
going to do that, you might as well cut out the doors and all that jazz. This
is one of those projects that just doesn't end with a
single modification. It keeps going, and going, and going.
"If you give a mouse a cookie…"
I'd be happy to answer any questions you may have about this
project (or anything else on my site), but don't waste time emailing me… SpamBots are sure to fill my email inbox to capacity every
day, so it's practically useless. A better way to find me is in the Sandbox (alt.toys.gi-joe) because I lurk there almost daily and if
I'm not around enough folks there know how to find me that it's your best bet.
I much prefer posting to email anyway!
LMK what you think
of this project, or any other stuff you stumble across on my website!
- ATC
Click the logo to go home ![]()
or click the bar to email me, the ATCommander@adventureteam.com ![]()
If you email me, put "Sandbox" in the subject line or it'll get
auto-deleted.