|
|
|
The
German "SPAT" GUN
Self-Propelled Anti-Tank Gun
Here's yet another GI JOE vehicle project -- this time
centered around the M5 Stuart chassis.
Back when these went on clearance, I was fortunate enough to pick up an
extra 27mhz tank.
The tank's chassis and running gear went to GIDefender for an AT
project, and the shell (the "hull") became the basis of this project. I decided that having a German hull and the
regular M5 hull meant that I could swap the chassis back and forth between 'em depending on
whether I wanted to use a German or American tank. I also picked up a clearance 49mhz
tank that will remain on its original chassis. By using
this German hull on the 27mhz chassis we can do battle
between it and the 49mhz camo M5 tank in the back
yard. Fun!
Choices
 Now I had a
spare hull, but wasn't sure what to build on it. I wanted a German tank of some kind, but
wasn't keen on scracthbuilding a turret. Besides, an open top (like the White Scout
Car) would offer greater play value.
Thus, I decided on a German Self-Propelled artillery piece. GIDefender donated
a 75mm cannon from the back of a Hasbro halftrack, so the rest seemed to be
destiny - the only remaining question was
Now I had a
spare hull, but wasn't sure what to build on it. I wanted a German tank of some kind, but
wasn't keen on scracthbuilding a turret. Besides, an open top (like the White Scout
Car) would offer greater play value.
Thus, I decided on a German Self-Propelled artillery piece. GIDefender donated
a 75mm cannon from the back of a Hasbro halftrack, so the rest seemed to be
destiny - the only remaining question was  what shape to
make the SP AT gun (that I'm gong to call a "tank")?
what shape to
make the SP AT gun (that I'm gong to call a "tank")?
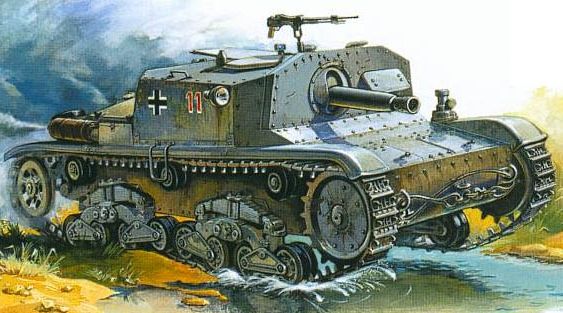
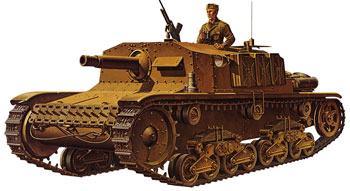
The
Italian Semovente M40-75/18 had promise. It's an Italian tank (in this pic it has German markings) that was small enough and was
easily do-able, but one distinct characteristic of this self-propelled gun is
the suspension. The M5 suspension would
require too much modification, and I wasn't keen on messing with the chassis if
I could help it. I had to find a design
that would look ok with the Stuart bogie design, even if it wasn't especially
accurate from a historical perspective.
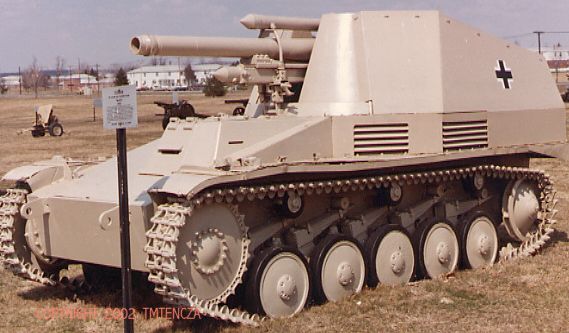 I ran across
the Wespe self-propelled field artillery piece. This looked like it might be a player! The suspension was 'way off, but the hull met
my criteria for
I ran across
the Wespe self-propelled field artillery piece. This looked like it might be a player! The suspension was 'way off, but the hull met
my criteria for 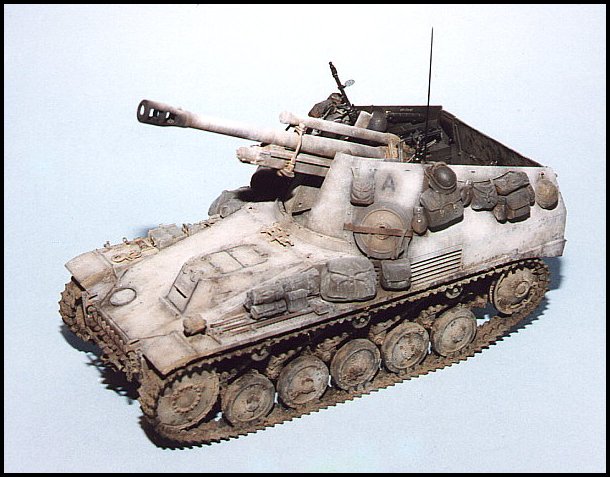 open-top play
value! I liked the lines and its size,
too. This looked like a good model for
my project - at least as a starting point.
Note the really groovy driver's hatch.
With no hull machine gun, it'd ease my building time, too! I thought this might be the way to go. I'd be using a 75mm Anti-Tank gun rather than
a giant howitzer-type gun, but it still might be cool.
open-top play
value! I liked the lines and its size,
too. This looked like a good model for
my project - at least as a starting point.
Note the really groovy driver's hatch.
With no hull machine gun, it'd ease my building time, too! I thought this might be the way to go. I'd be using a 75mm Anti-Tank gun rather than
a giant howitzer-type gun, but it still might be cool.
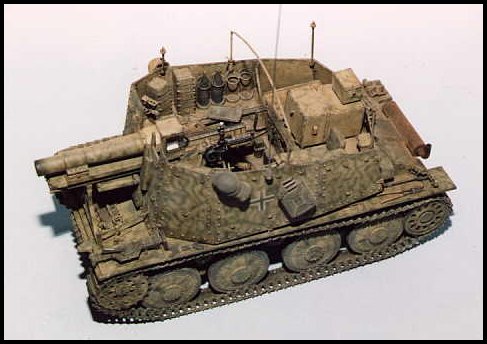
 I ran across some uglier designs, too, like this
German Marder II SP AT 7.5cm gun. It was one ugly
I ran across some uglier designs, too, like this
German Marder II SP AT 7.5cm gun. It was one ugly 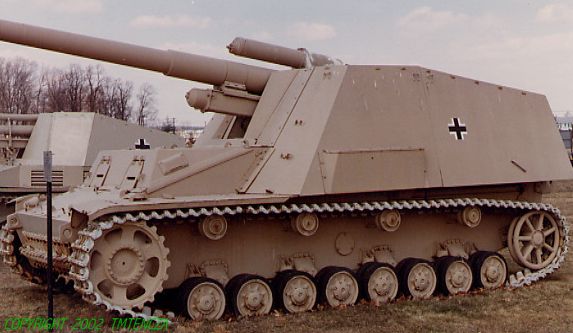 beast!
The SP Howitzer "Hummel" (Bumble
Bee) was even bigger with a longer chassis, bigger gun, and larger fighting
compartment. These Germans made some
awful-looking tracked vehicles!
 During my research, things went from bad to
worse. The Bison Ausf H
(left) was no beauty queen. It had
a HUGE fighting compartment and looked awfully heavy.
During my research, things went from bad to
worse. The Bison Ausf H
(left) was no beauty queen. It had
a HUGE fighting compartment and looked awfully heavy.
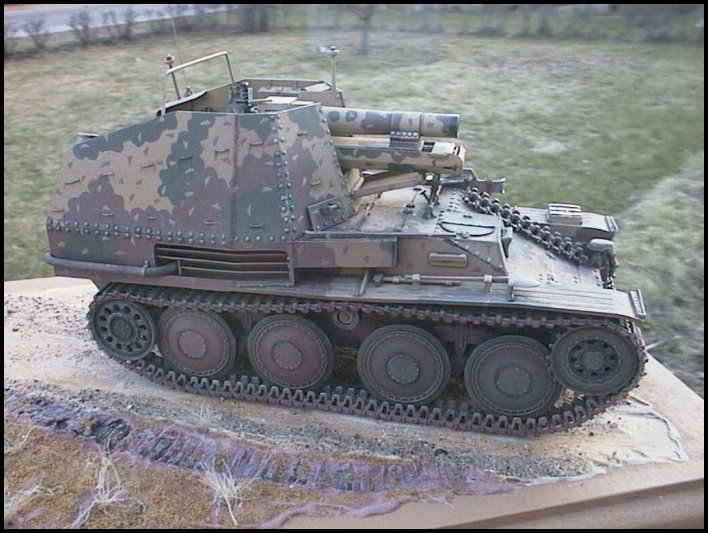
The SdKfz 138/1 Ausf M "Grille" was based on the Czech chassis (used by the Germans as the 38t) and was a better design, but lacked room in the fighting compartment, which was an important consideration for a Joe vehicle. o:p>
At
right is the 15cm PzKpfy 1 AusfB. It's one ugly field piece. My goal of a believable-looking armored vehicle was
going to be easier to obtain than I thought!
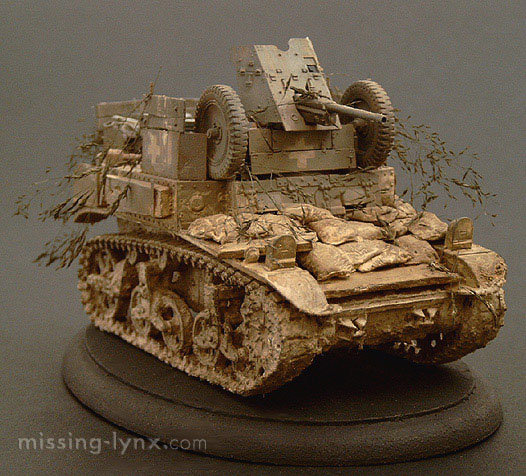 It got easier
after some further research. The Germans
used captured vehicles whenever they could.
At left you'll see the 3.7cm antitank gun mounted precariously on an M3
Stuart chassis. Hmm...
if this kind of an ersatz AT gun was fielded, I could
probably build whatever I wanted on the M5 chassis and it'd be plausible
(especially as a toy rather than as a historical model!).
It got easier
after some further research. The Germans
used captured vehicles whenever they could.
At left you'll see the 3.7cm antitank gun mounted precariously on an M3
Stuart chassis. Hmm...
if this kind of an ersatz AT gun was fielded, I could
probably build whatever I wanted on the M5 chassis and it'd be plausible
(especially as a toy rather than as a historical model!).
The
plan started to come together...
The learning point here was that I
could create my OWN design and it'd look passably authentic. After all, the Germans had some pretty goofy-looking armor and used a lot of captured armor and field modifications anyway.
Any original design I came up with couldn't look much worse than some of the tracked guns the Germans REALLY
fielded!
The Adventure Team
Commander's
German SPAT Gun
"SPAT"? Self-Propelled Anti-Tank gun.
The
Chassis:
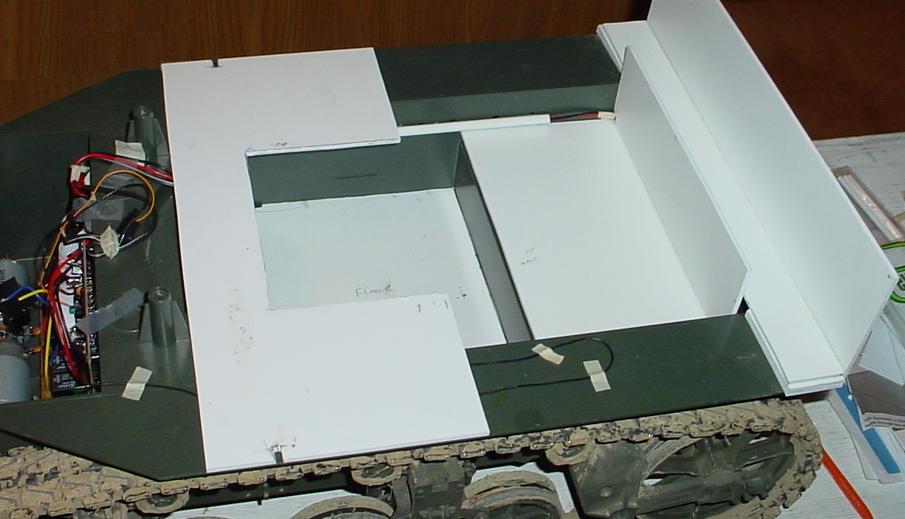
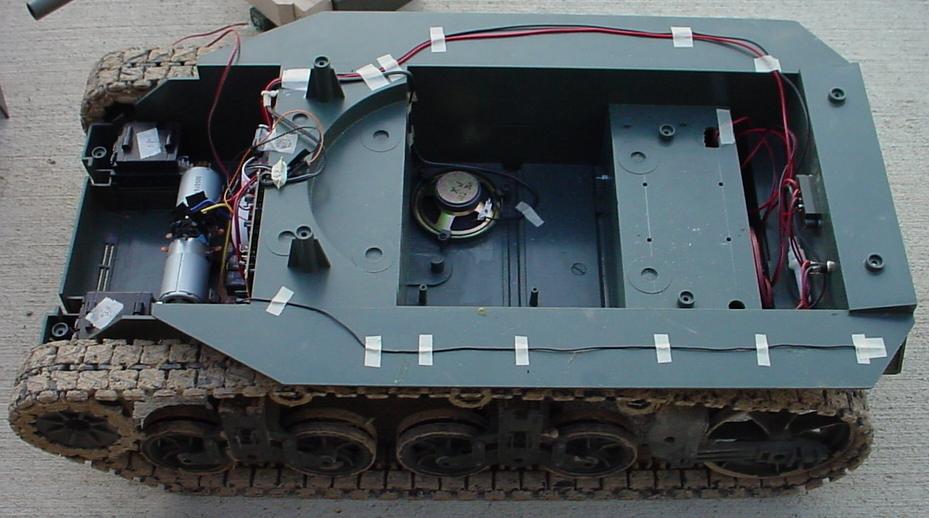 Back when I did some modification of my first M5
Stuart, I had moved the battery underneath and moved the radio forward on the
front firewall. Details can be found at http://gijoe.50megs.com/StuartMods.html (on that page you can see in great detail what I did
and how I did it). Here is the pic of the chassis, prepared to begin THIS project. The charging jack has been added to the rear
of the tank, the battery was relocated underneath, and the R/C radio was moved
to the front firewall. This opened up
the “fighting compartment” nicely. I
left the speaker where it was, as I figured I’d add a fake floor there anyway
and it could rest upon the speaker for support.
I’d done all of this a long, long time ago knowing full well that
eventually I’d make a Priest, Kangaroo, Recovery Vehicle, AT Vehicle, Lost in
Space Chariot, or SOMETHING out of this groovy chassis! Thus, the only remaining challenges for
this project were final interior touches as well as designing and building the shell
or "hull" to put on the existing M5 chassis. I made some “sort of” goals to add a driver’s
seat, ventilation, a hull that looked like something the Axis would field, and
then would add details (crew and interior stuff) to finish it off.
Back when I did some modification of my first M5
Stuart, I had moved the battery underneath and moved the radio forward on the
front firewall. Details can be found at http://gijoe.50megs.com/StuartMods.html (on that page you can see in great detail what I did
and how I did it). Here is the pic of the chassis, prepared to begin THIS project. The charging jack has been added to the rear
of the tank, the battery was relocated underneath, and the R/C radio was moved
to the front firewall. This opened up
the “fighting compartment” nicely. I
left the speaker where it was, as I figured I’d add a fake floor there anyway
and it could rest upon the speaker for support.
I’d done all of this a long, long time ago knowing full well that
eventually I’d make a Priest, Kangaroo, Recovery Vehicle, AT Vehicle, Lost in
Space Chariot, or SOMETHING out of this groovy chassis! Thus, the only remaining challenges for
this project were final interior touches as well as designing and building the shell
or "hull" to put on the existing M5 chassis. I made some “sort of” goals to add a driver’s
seat, ventilation, a hull that looked like something the Axis would field, and
then would add details (crew and interior stuff) to finish it off.
The
Driver’s Seat:
 First, I decided I needed a driver's seat. In addition to needing it for this project, I
also wanted to use the same chassis as the basis for a Australian “Kangaroo” (potential future project)
that’d need a driver, too… making the modification now will help this project AND
be already in place for the next! I
wanted a single seat in the hull and an offset driving compartment like on the Wespe (see the pic in the second
paragraph at the top of this webpage).
To that end, I needed to find a Joe that was flexible, light, and would
look ok in that position. The CC and SA
Joes seemed heavier and clunkier, whereas the
vintage-style would squeeze in and out more easily. I chose "Carl",
and Elite Brigade figure from Cots. This
guy looks like James Cagney, only in blonde he looked like a tough, wiry,
non-nonsense Aryan tank driver. Using
the figure as my measuring device, I epoxied some
seat runners over the port-side engine and built a seat to slide into
position. Here you can see how easily
this was to install.
First, I decided I needed a driver's seat. In addition to needing it for this project, I
also wanted to use the same chassis as the basis for a Australian “Kangaroo” (potential future project)
that’d need a driver, too… making the modification now will help this project AND
be already in place for the next! I
wanted a single seat in the hull and an offset driving compartment like on the Wespe (see the pic in the second
paragraph at the top of this webpage).
To that end, I needed to find a Joe that was flexible, light, and would
look ok in that position. The CC and SA
Joes seemed heavier and clunkier, whereas the
vintage-style would squeeze in and out more easily. I chose "Carl",
and Elite Brigade figure from Cots. This
guy looks like James Cagney, only in blonde he looked like a tough, wiry,
non-nonsense Aryan tank driver. Using
the figure as my measuring device, I epoxied some
seat runners over the port-side engine and built a seat to slide into
position. Here you can see how easily
this was to install.
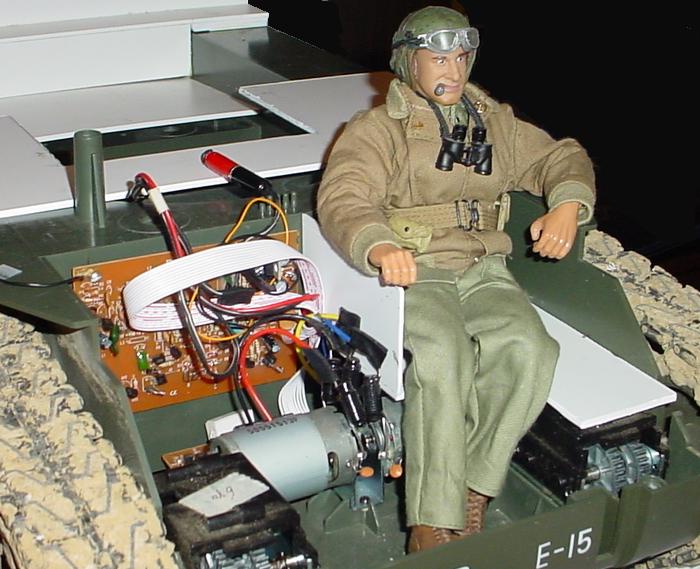 Here you can see the driver’s seat. No, that's not the Cotswold "Carl" in the seat, it's the 21C tank commander checking it out. Thanks to the gearbox, his legs are angled a
little off-center, but it still worked fine.
Reminds me of the test drive I took in a Jeep Cherokee once… the pedals
were offset to make room for the wide center transmission hump - felt like I
was sitting crooked. I had more leg room
in my Toyota Tercel (no, I didn’t buy the
Cherokee). Anyway, this setup works well
for Joe in the driver’s seat. It
provides protection of the gears (to keep his pantlegs
out of the way, and keeps his butt off the hot engine. Playtesting will
reveal whether it’ll get hot enough to melt that soft styrene plastic or not.
Here you can see the driver’s seat. No, that's not the Cotswold "Carl" in the seat, it's the 21C tank commander checking it out. Thanks to the gearbox, his legs are angled a
little off-center, but it still worked fine.
Reminds me of the test drive I took in a Jeep Cherokee once… the pedals
were offset to make room for the wide center transmission hump - felt like I
was sitting crooked. I had more leg room
in my Toyota Tercel (no, I didn’t buy the
Cherokee). Anyway, this setup works well
for Joe in the driver’s seat. It
provides protection of the gears (to keep his pantlegs
out of the way, and keeps his butt off the hot engine. Playtesting will
reveal whether it’ll get hot enough to melt that soft styrene plastic or not.
The
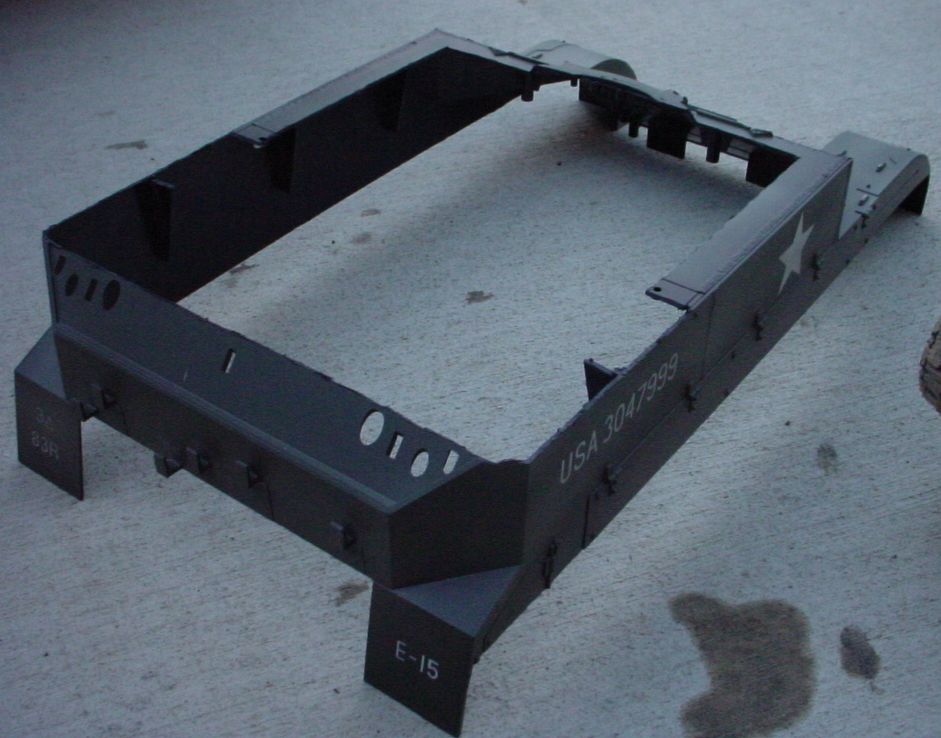
 Next I built the hull up into the shape I
wanted. That meant using a Dremel tool to change the shape of the front of the glacis
plate. As you can see here, I took off
everything I possibly could, including the lights, brush guards, machine gun,
spare bogie, etc, and began cutting with my trusty Dremel. You’ll note that I cut straight along the
sides rather than matching the existing seam.
This will give the finished product a straight slant to the front glacis
plate rather than that “hump” the M5 has along the front line of the
hatches. My hope is that the straight
glacis will look more slanted and “Panther-ish” than
the M5s abrupt angles.
Next I built the hull up into the shape I
wanted. That meant using a Dremel tool to change the shape of the front of the glacis
plate. As you can see here, I took off
everything I possibly could, including the lights, brush guards, machine gun,
spare bogie, etc, and began cutting with my trusty Dremel. You’ll note that I cut straight along the
sides rather than matching the existing seam.
This will give the finished product a straight slant to the front glacis
plate rather than that “hump” the M5 has along the front line of the
hatches. My hope is that the straight
glacis will look more slanted and “Panther-ish” than
the M5s abrupt angles.
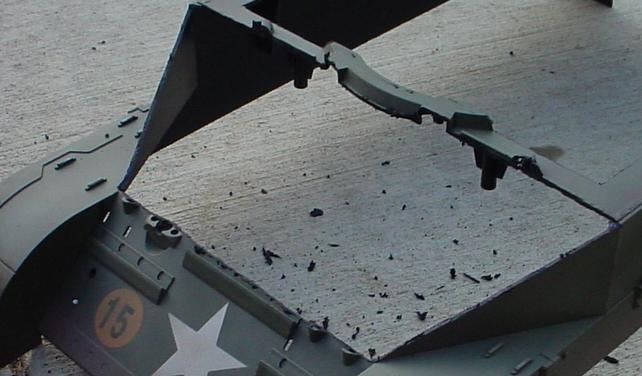
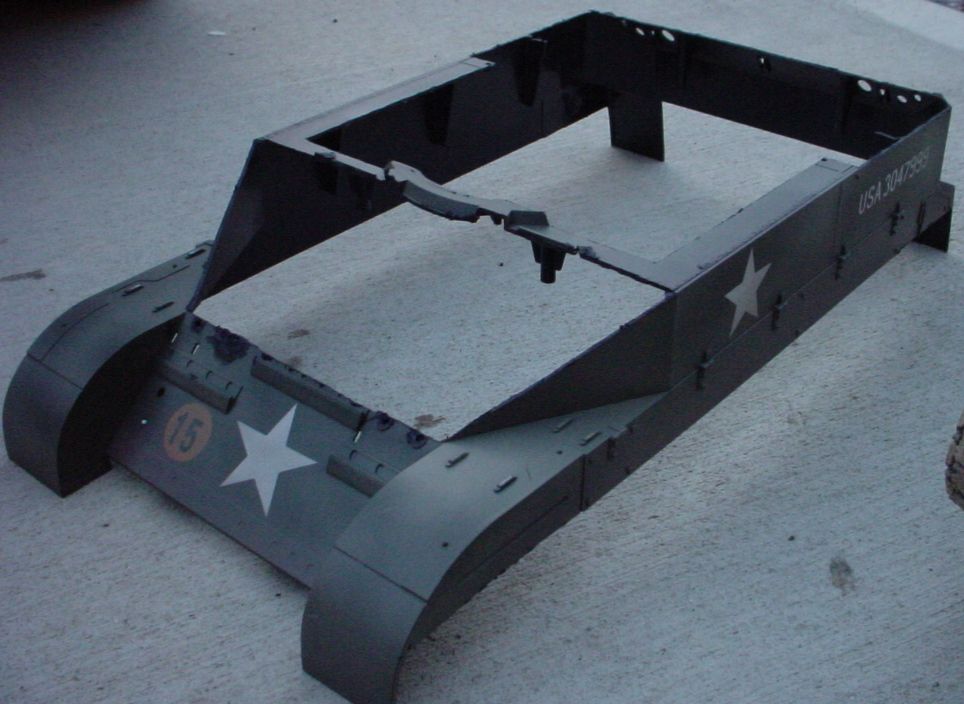 I had to open the deck up, too. Here I cut along the top edge of the Stuart
hull, and I made a straight cut along the rear sides rather than leaving the
“hump” where the oversized engine compartment was formerly located. I tried to leave as much as I could where it
was necessary to fasten the hull to the chassis or otherwise for support. Here you can see how much I cut away from the
front and from the top deck. It’s also
apparent where I gave the hull straight sides instead of the engine
“hump”. Cutting this black styrene with
a Dremel is very messy work, by the way. If you plan on doing this, don’t do it on
your kitchen table where bits of molten black plastic will fly into the living
room and land on the carpet. It will
probably make your spouse angry when she gets back with groceries and sees what
you’ve done. Rather than be proud of you
for your ingenuity and your efficient, clever solution, she’ll more likely harp
and crab at you until you vacuum the living room and wash the kitchen floor.
I had to open the deck up, too. Here I cut along the top edge of the Stuart
hull, and I made a straight cut along the rear sides rather than leaving the
“hump” where the oversized engine compartment was formerly located. I tried to leave as much as I could where it
was necessary to fasten the hull to the chassis or otherwise for support. Here you can see how much I cut away from the
front and from the top deck. It’s also
apparent where I gave the hull straight sides instead of the engine
“hump”. Cutting this black styrene with
a Dremel is very messy work, by the way. If you plan on doing this, don’t do it on
your kitchen table where bits of molten black plastic will fly into the living
room and land on the carpet. It will
probably make your spouse angry when she gets back with groceries and sees what
you’ve done. Rather than be proud of you
for your ingenuity and your efficient, clever solution, she’ll more likely harp
and crab at you until you vacuum the living room and wash the kitchen floor.
The
Cannon:
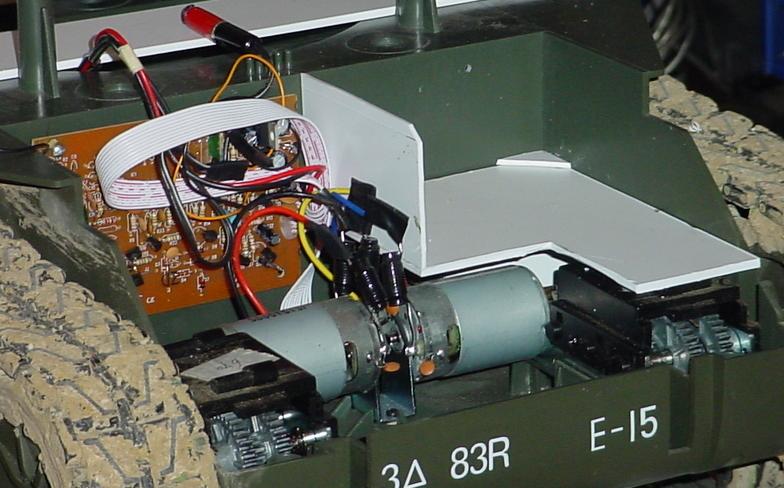
Next came the cannon. GI Defender sent a 75mm cannon my way and it would be perfect for this
project. I was planning to use the Navy
40mm pom-pom guns, the 37mm Hasbro AT gun, a vintage 5-Star recoilless rifle,
or the big ol’ Howitzer cannon, but this 75mm gun
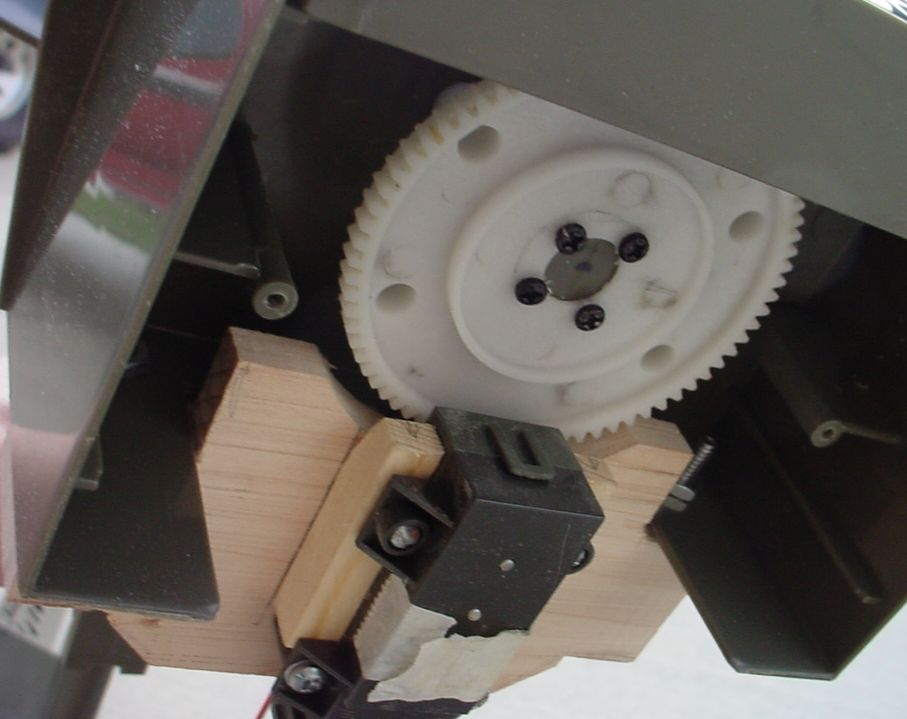
looked like it’d be better than any of the other choices! I used the guts from the M5 Stuart tank
turret and mounted them underneath the cannon base. This took a few minutes in the garage on the
table saw to rough out the shape. Then I
used a belt sander to do the final shaping until I got it the shape I
wanted. I used the gears and gearbox
from the M5 Stuart and simply screwed the big turret gear to the bottom of the
75mm pintle.
It worked great!
 After I mounted the gearbox, I had to fit it to the
chassis. I did this by cutting sheet
styrene to fit the base of the 75mm cannon and across the width of the
hull. The gearbox stuck out toward the
driving compartment. In the pic at left you can see how I did it. Later I added some vertical supports made of
styrene. This held the gun firmly in
place without being glued down. It was
important to ensure that everything was easily removable, since I intend to use
this hull for other projects later (like the Aussie Kangaroo project). My
Master Plan is to use this hull with several hull bodies for various purposes,
thus maximizing play options while minimizing storage requirements.
After I mounted the gearbox, I had to fit it to the
chassis. I did this by cutting sheet
styrene to fit the base of the 75mm cannon and across the width of the
hull. The gearbox stuck out toward the
driving compartment. In the pic at left you can see how I did it. Later I added some vertical supports made of
styrene. This held the gun firmly in
place without being glued down. It was
important to ensure that everything was easily removable, since I intend to use
this hull for other projects later (like the Aussie Kangaroo project). My
Master Plan is to use this hull with several hull bodies for various purposes,
thus maximizing play options while minimizing storage requirements.
The
Interior:
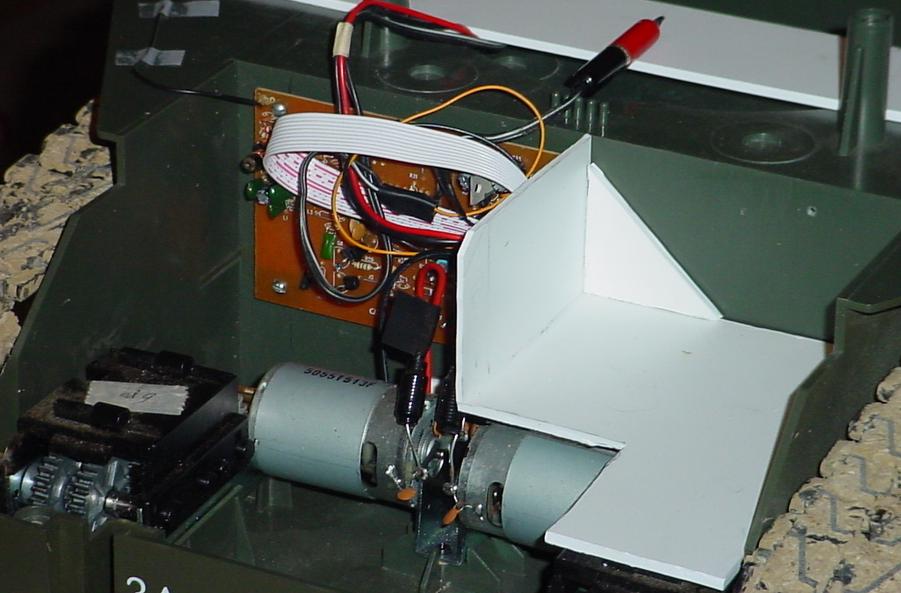
 During the time I was working on the cannon, I was
also working on the interior. I seldom
do just one thing at a time because I get bored waiting for glue to dry and
usually begin another aspect of the project.
Here’s the interior in its infancy (at left). Here I added the brace for the cannon and
also added a rear seat. I tried many
different types of glue in this project and had some abysmal results from
Gorilla Glue as well as some others. JB
Weld and good ol’ 2-part Epoxy (Loc-Tite) were the winners for this project. Here you can also see the fake floor I put
over the rear of the speaker and across some screw-points that were made to
hold the R/C board that I moved up front.
During the time I was working on the cannon, I was
also working on the interior. I seldom
do just one thing at a time because I get bored waiting for glue to dry and
usually begin another aspect of the project.
Here’s the interior in its infancy (at left). Here I added the brace for the cannon and
also added a rear seat. I tried many
different types of glue in this project and had some abysmal results from
Gorilla Glue as well as some others. JB
Weld and good ol’ 2-part Epoxy (Loc-Tite) were the winners for this project. Here you can also see the fake floor I put
over the rear of the speaker and across some screw-points that were made to
hold the R/C board that I moved up front.
 With the R/C radio on the firewall in the engine
compartment, I didn’t want any more heat than necessary in the forward compartment. The seat I added for the driver would
probably not help, neither would a figure up
there. Thus began my quest for a way to
cool the enclosed compartment. Like
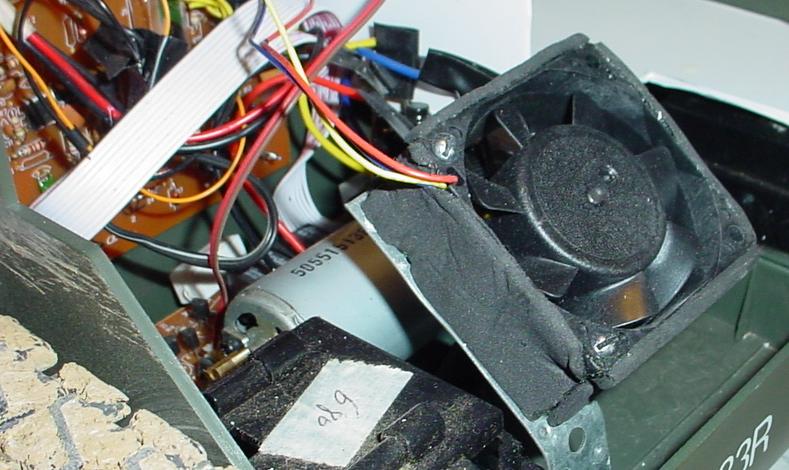
lightning, a solution suddenly appeared! Literally.
Our house took a lightning strike and blew the snot out of a computer
power supply. Just for fun, I tore the
old power supply apart to see what was inside (I often do that with mechanical
stuff due to my never-ending curiosity and need to know how stuff works). Inside I found a cool little fan that ran off
12 volts. I applied power and the fan
still worked, even though the power supply was dead. Hmm... the gel cell that powers the Stuart is also 12V... it looks
like I found myself an M5 engine ventilation solution! You can see in this pic
how I installed the fan. I used a piece
of metal strapping from the junk box in
With the R/C radio on the firewall in the engine
compartment, I didn’t want any more heat than necessary in the forward compartment. The seat I added for the driver would
probably not help, neither would a figure up
there. Thus began my quest for a way to
cool the enclosed compartment. Like
lightning, a solution suddenly appeared! Literally.
Our house took a lightning strike and blew the snot out of a computer
power supply. Just for fun, I tore the
old power supply apart to see what was inside (I often do that with mechanical
stuff due to my never-ending curiosity and need to know how stuff works). Inside I found a cool little fan that ran off
12 volts. I applied power and the fan
still worked, even though the power supply was dead. Hmm... the gel cell that powers the Stuart is also 12V... it looks
like I found myself an M5 engine ventilation solution! You can see in this pic
how I installed the fan. I used a piece
of metal strapping from the junk box in 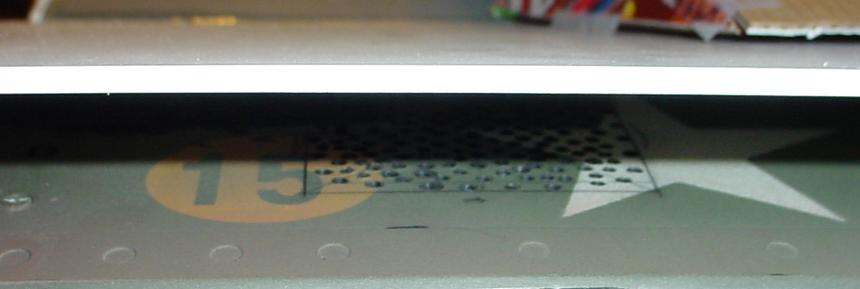 my garage and just bolted the fan to the strapping
and to the floor of the M5 chassis. 12V
is running all over the place in the engine compartment, so finding
12VDC isn’t very difficult. I used the
main power lines to the R/C radio board (the wires fit nicely in the backside
of the male connector running to the PC board.
The power for the fan runs directly to the power source to the tank, so
whenever the tank is on the fan is running. I added a switch, just for fun.
I drilled as many holes as I could in the the
hull for ventilation (in the pics you can see the
holes… the new armor leaves a little room for airflow and the holes I added to
the original M5 hull beneath match up with the fan location). I would've opened up a gaping hole for fan
access, but I wanted something to protect the fan blades if I ran through grass
or sticks while on patrol - thus I drilled lots of holes to make a redneck
“grille” over the fan.
my garage and just bolted the fan to the strapping
and to the floor of the M5 chassis. 12V
is running all over the place in the engine compartment, so finding
12VDC isn’t very difficult. I used the
main power lines to the R/C radio board (the wires fit nicely in the backside
of the male connector running to the PC board.
The power for the fan runs directly to the power source to the tank, so
whenever the tank is on the fan is running. I added a switch, just for fun.
I drilled as many holes as I could in the the
hull for ventilation (in the pics you can see the
holes… the new armor leaves a little room for airflow and the holes I added to
the original M5 hull beneath match up with the fan location). I would've opened up a gaping hole for fan
access, but I wanted something to protect the fan blades if I ran through grass
or sticks while on patrol - thus I drilled lots of holes to make a redneck
“grille” over the fan.
The
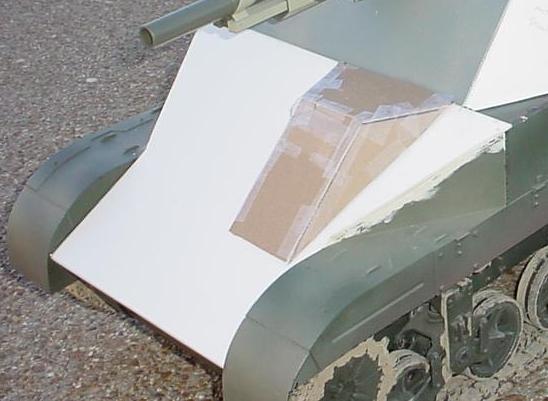
Mounting the cannon wasn’t a big deal, but getting it through the hull is a 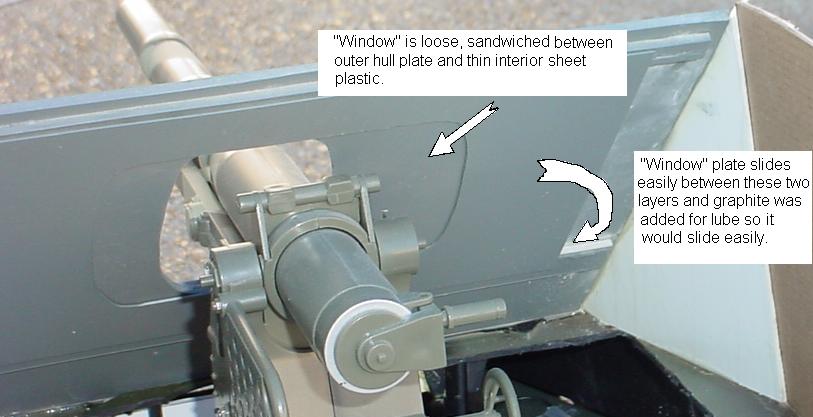 bigger challenge.
I tried all sorts of approaches, even going so far as to try two
different sized plastic flower pots, figuring that then I’d have a rounded spot
on the hull for the cannon to stick out while giving it room to spin as the
cannon rotates. All of my different
experiments were failures, but the final one seemed ok, so I went with it. This final experiment used a simple sliding
window approach to permit the cannon room to move. I mounted a couple of runners along the
backside of the front armor plate and trapped a flat sheet of styrene by gluing
on the backside of the runners. A
picture is worth a thousand words, so see the pic and
you’ll see how I did it. The cannon
itself pushes the movable “window” from side to side as it rotates. This minimizes the size of the hole needed to
let the cannon protrude. I intend to
make a canvas-looking cover to snap onto the hull and around the base of the
cannon to hide the hole anyway, so this was probably a lot more hassle than it
needed to be; but I enjoyed the engineering challenge despite the unnecessary
nature of this feature!
bigger challenge.
I tried all sorts of approaches, even going so far as to try two
different sized plastic flower pots, figuring that then I’d have a rounded spot
on the hull for the cannon to stick out while giving it room to spin as the
cannon rotates. All of my different
experiments were failures, but the final one seemed ok, so I went with it. This final experiment used a simple sliding
window approach to permit the cannon room to move. I mounted a couple of runners along the
backside of the front armor plate and trapped a flat sheet of styrene by gluing
on the backside of the runners. A
picture is worth a thousand words, so see the pic and
you’ll see how I did it. The cannon
itself pushes the movable “window” from side to side as it rotates. This minimizes the size of the hole needed to
let the cannon protrude. I intend to
make a canvas-looking cover to snap onto the hull and around the base of the
cannon to hide the hole anyway, so this was probably a lot more hassle than it
needed to be; but I enjoyed the engineering challenge despite the unnecessary
nature of this feature!
The
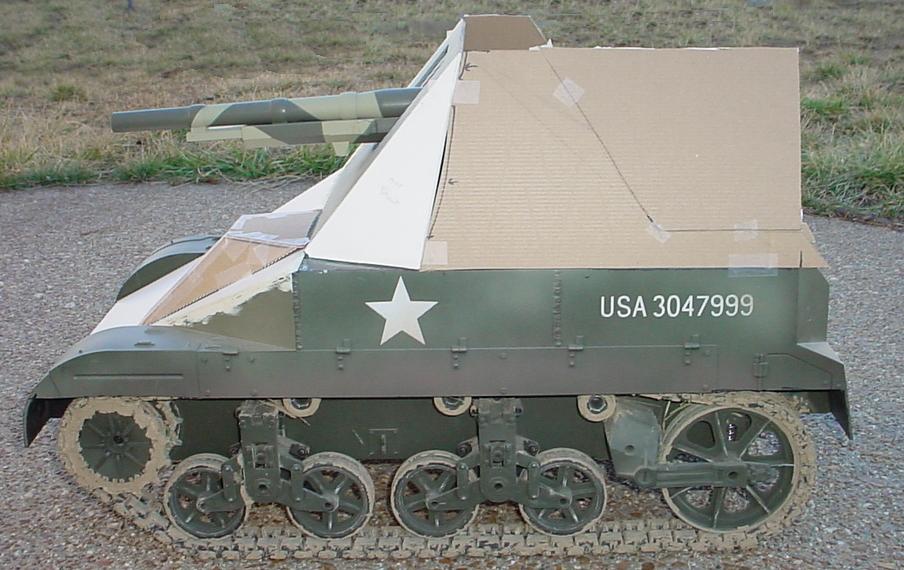
 Unsure what final design I wanted, I made a few
cardboard mockups to see which I liked best.
Here you can see the cardboard mockups I made. At left is the more cutaway design and at
right is the blockier more full-coverage design. In the pic in the paragraph below, you can pic see the line indicating the difference
between the two. I actually made a
removable armor template piece that slid on and off so I could compare
designs. Although the more open “Marder-ish” design looks cool, it doesn’t look as good when
crew are lounging around inside. The
more enclosed version below looks cooler with crew. I think I’ll go for the more enclosed version,
but perhaps I’ll leave the back somewhat open so it’ll be easier to get stuff
in and out (and will have more play value, too). Besides, if the side armor is bigger,
there’ll be more room for a big ol’ German cross for
the Stuart to aim at!
Unsure what final design I wanted, I made a few
cardboard mockups to see which I liked best.
Here you can see the cardboard mockups I made. At left is the more cutaway design and at
right is the blockier more full-coverage design. In the pic in the paragraph below, you can pic see the line indicating the difference
between the two. I actually made a
removable armor template piece that slid on and off so I could compare
designs. Although the more open “Marder-ish” design looks cool, it doesn’t look as good when
crew are lounging around inside. The
more enclosed version below looks cooler with crew. I think I’ll go for the more enclosed version,
but perhaps I’ll leave the back somewhat open so it’ll be easier to get stuff
in and out (and will have more play value, too). Besides, if the side armor is bigger,
there’ll be more room for a big ol’ German cross for
the Stuart to aim at!
 I couldn't figure out what shape to make the
hull. I lingered over this decision for
a long, long time until I finally just started cutting out cardboard
shapes. It took a while, but eventually
I found a shape I really liked, was do-able, and looked somewhat
authentic. Above and at left you can see
some of the different shapes I toyed with before choosing a final winner.
I couldn't figure out what shape to make the
hull. I lingered over this decision for
a long, long time until I finally just started cutting out cardboard
shapes. It took a while, but eventually
I found a shape I really liked, was do-able, and looked somewhat
authentic. Above and at left you can see
some of the different shapes I toyed with before choosing a final winner.
The ultimate shape doesn't look anything like the above pics...
I ended up going after the shape at left with a razor knife and kept trimming
it at different angles and shapes so it was practically gone by the time I was
finished. The process was valuable,
though, because I passed one version in the process that I really liked -- and
that was the one I ended up using.
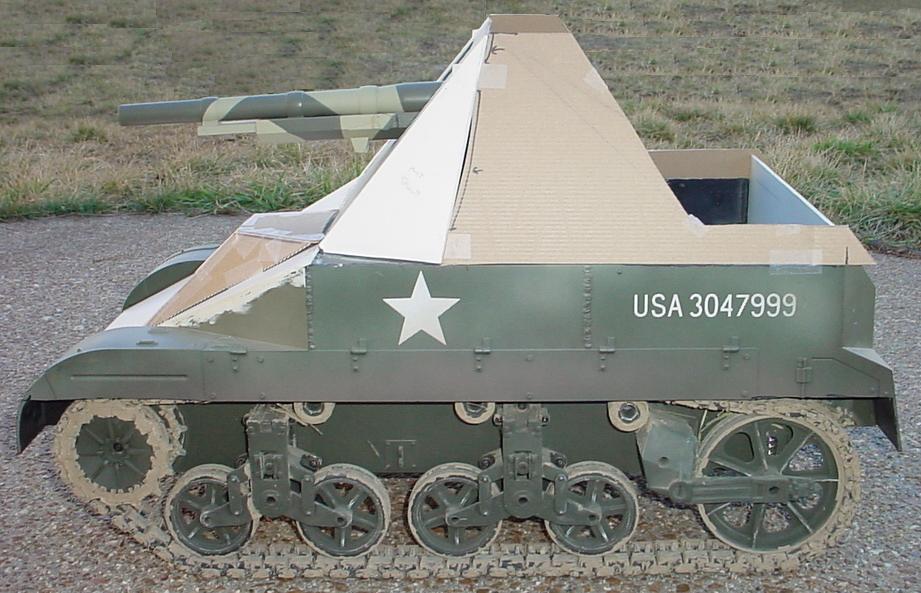
 You may have noticed that the armor plate is angled
differently than the M5 Stuart’s armor.
The Stu has more vertical armor, whereas this
is more angled. The beauty of this
design is that there’s enough room under the front of this armor for me to
stick a finger in there to dig out mud or debris - and there’s also plenty of
room for ventilation access to the fan.
I have yet to decide on whether to give it a driver’s hatch or not. I originally built the driver’s seat with the
intention of adding a Wesp-ish driver’s hatch, but
after adding the front armor plate, I was unsure. I really liked the long sloped front, but
it’d still be cool to have a driver’s noggin sticking out. Since I’ve already got the driver’s seat
inside, it’d be an easy enough proposition to cut a hole in the front glacis
and scratchbuild the sloped armor to add the
hatch. Hmm… decisions, decisions!
You may have noticed that the armor plate is angled
differently than the M5 Stuart’s armor.
The Stu has more vertical armor, whereas this
is more angled. The beauty of this
design is that there’s enough room under the front of this armor for me to
stick a finger in there to dig out mud or debris - and there’s also plenty of
room for ventilation access to the fan.
I have yet to decide on whether to give it a driver’s hatch or not. I originally built the driver’s seat with the
intention of adding a Wesp-ish driver’s hatch, but
after adding the front armor plate, I was unsure. I really liked the long sloped front, but
it’d still be cool to have a driver’s noggin sticking out. Since I’ve already got the driver’s seat
inside, it’d be an easy enough proposition to cut a hole in the front glacis
and scratchbuild the sloped armor to add the
hatch. Hmm… decisions, decisions!
During the cutting and
fitting phase, the crew had to try it out.
The Dragon tank commander and gunner checked out all the various areas
for habitability and minor adjustments were made to accommodate the
figures. I wanted them to look a certain
way when the hull was finished and tailored the hull to match my capricious
expectations. For example, I wanted a
certain level of "bend" in the commander's elbow and a a height that would be
appropriate for crew in the back to hang an arm over (in case they want to
drive slowly through a French town and pick up chicks). At left is a stage in building before I
arrived at the final design. I had to design in cardboard whenever possible to conserve that hard-to-get styrene.
Below, you'll see below what hull shape I
FINALLY decided upon.
Finished
Product:
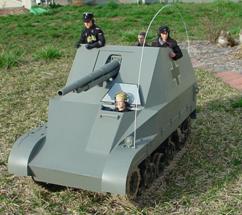
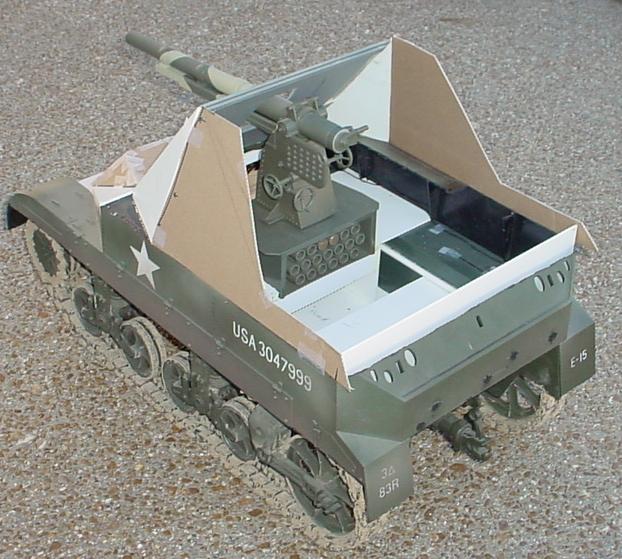
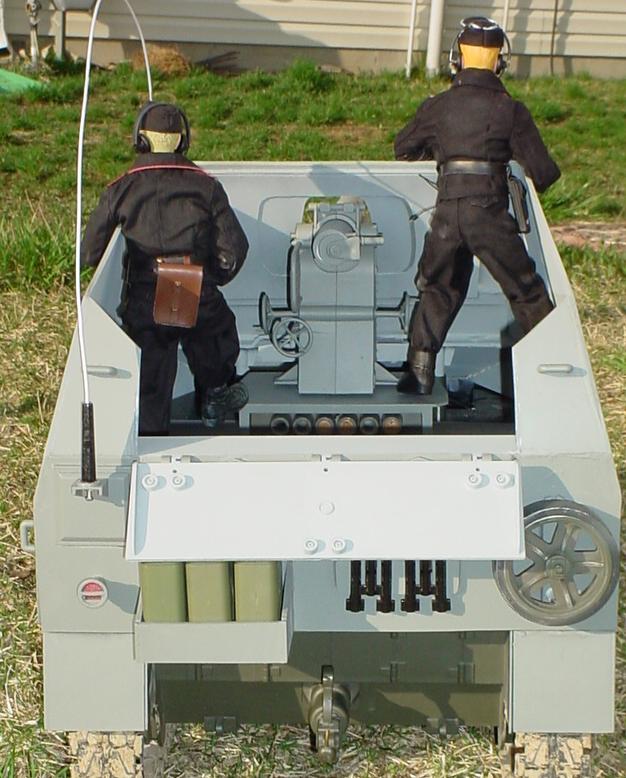
 Here's a look at the finished AT gun. At the time of the pic,
they were on patrol to find out who knocked over some of the HausFrau's
walkway lights and tossed them into the shrubbery. The local resistance fighters are a constant
nuisance to the HausFrau, and the German AT Gun crew
is here to put a stop to it!
Here's a look at the finished AT gun. At the time of the pic,
they were on patrol to find out who knocked over some of the HausFrau's
walkway lights and tossed them into the shrubbery. The local resistance fighters are a constant
nuisance to the HausFrau, and the German AT Gun crew
is here to put a stop to it!
This pic clearly
shows the color mismatch between the old chassis and the new hull. Since this chassis is STILL the undercarriage
of my M3 as well as this German gun, I decided not to paint it. Soon it'll be the basis for other projects,
so I decided not to repaint it.
 Here' s the interior.
I used a darker grey on the outside and a lighter shade of grey on the
inside. In the goofy light here, it
looks white, but it's really light grey.
If you look closely, you'll see that I gave the floor a
"splatter" of paint to make it look worn and dirty from their combat
boots. This pic
also shows the gun mount a little better.
I picked up some brass at the local shooting range that fit the ammo
storage slots (not shown). I forget what
caliber they were, but they had a rim (like the plastic Hasbro shells) and the
brass cases slid nicely into the storage holes beneath the cannon. These pieces of expended brass will also be
cool in a diorama, as I can toss them on the ground behind the vehicle - where
the loader heaved them during the reloading process. Plus the brass is dirty looking, so it adds
to the realism a bit.
Here' s the interior.
I used a darker grey on the outside and a lighter shade of grey on the
inside. In the goofy light here, it
looks white, but it's really light grey.
If you look closely, you'll see that I gave the floor a
"splatter" of paint to make it look worn and dirty from their combat
boots. This pic
also shows the gun mount a little better.
I picked up some brass at the local shooting range that fit the ammo
storage slots (not shown). I forget what
caliber they were, but they had a rim (like the plastic Hasbro shells) and the
brass cases slid nicely into the storage holes beneath the cannon. These pieces of expended brass will also be
cool in a diorama, as I can toss them on the ground behind the vehicle - where
the loader heaved them during the reloading process. Plus the brass is dirty looking, so it adds
to the realism a bit.
To
the right you can see a shallower angle rear-view with the hatch open.
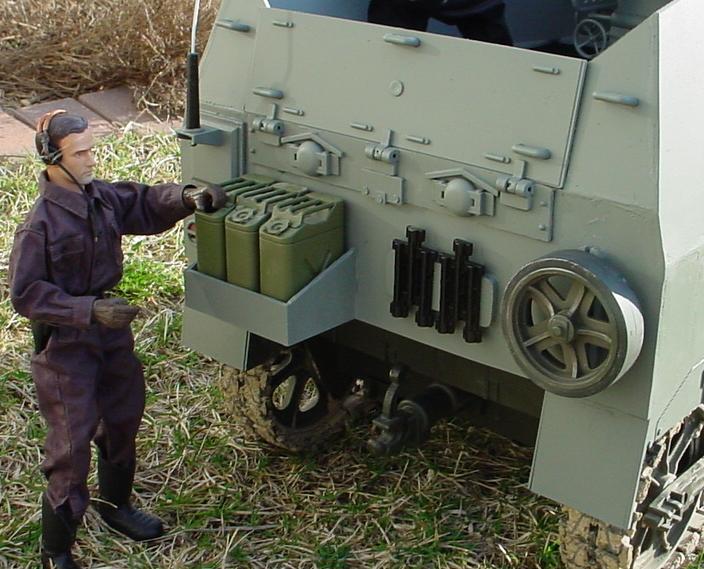 Here's the loader checking on the fuel cans. This pic shows the
spare bogie wheel attached to the rear hull, the antenna mount, extra track
links, and the fuel can rack.
Here's the loader checking on the fuel cans. This pic shows the
spare bogie wheel attached to the rear hull, the antenna mount, extra track
links, and the fuel can rack.
The bogie wheel came from the front of the
original M5 Stuart's hull and already had a couple of mounting screws. I glued a sheet plastic mount to the rear of
the hull with a couple of "keyhole" slots to slide the screws
into. Sort of like hanging a picture,
just insert the bogie wheel's screw heads into the fat part of the keyhole and
slide straight down. It's neat and
secure.
the spare track links came from the turret of the
original M5 Stuart. I painted them black
and made a slide-in rack for those, too.
To remove, just slide the link section straight up and it pops off the
rack.
The gas can rack was made by simply lining
up three gas cans and cutting out a rectangle of plastic with the same
"footprint". Then I built up
the sides and front, and glued the whole thing to the rear hull.
You'll also notice the rear hatch on this
vehicle happens to be the battery door (engine cover) on the original M5
hull. The hinges worked great! I also re-used some grab-handles and other
little odds and ends. It's recycling at its best!
Finally, the antenna mount has been lifted
from the M5 turret, too! It fit in that
spot very nicely and looks like it really belongs. It was just a spur-of-the-moment thing, as I
hadn't planned on adding an antenna mount to this vehicle. The black part at the bottom of the mount is
a chunk of soft plastic I had in my junk box (the kind of plastic Green Army
Men are made of). Instead of a spring,
it adds enough antenna flexibility to prevent anything from becoming
accidentally broken.
The
Crew:
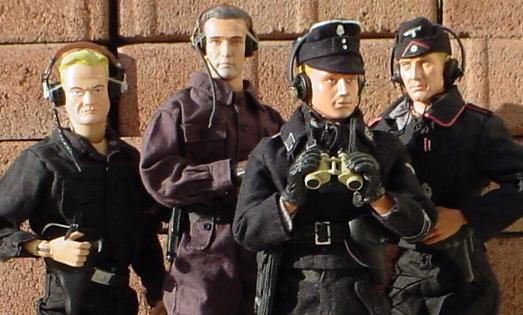 Here's the crew.
Originally, I looked high and low for a Hasbro German Tank Commander
figure, but couldn't find one at a reasonable price. It seems that figure must've been made of gold
or something. Instead, I found a great
deal on a Dragon tank commander. This is
the "small body" version that's noticeably shorter than the other
Herculean Dragon figures. He came with a
great uniform and all of the appropriate accessories (headphones, throat mic, etc). I also
picked up a second Dragon figure to be the gunner.
I forget what figure this is (he's at the far right in this pic -- if you know what figure he is, LMK in the Sandbox), but he came with some great coveralls in
addition to his black tanker uniform.
The black tanker coveralls were used to "kitbash"
a loader along with some Cots-type boots and a set of headphones from the junkbox. The loader
figure was "Christian" the snow troop skiier
guy, so he already had gloved hands (appropriate for a loader!). As for the driver, I used a Cotswold
figure. He seemed to be able to get in
and out of the driver's hatch more easily than most figures and I kinda built the spot for him. I ran out of German uniform options at this
point, so I grabbed some black clothing ('Nam Viet Cong, I think... SWAT
perhaps) and gave him a German pistol and junkbox
headphones and he makes a passable driver.
The Loader and Driver both have those clear rubber bands holding on
their headsets. Those softer plastic
headsets don't stay on worth beans. You
have to make do with what you've got , though! If I ever run into a good deal on black
tanker uniforms and better headsets for the Loader and Driver, I'll swap stuff
out so they all look as good as the Commander and Gunner. Until then, these guys will have to do!
Here's the crew.
Originally, I looked high and low for a Hasbro German Tank Commander
figure, but couldn't find one at a reasonable price. It seems that figure must've been made of gold
or something. Instead, I found a great
deal on a Dragon tank commander. This is
the "small body" version that's noticeably shorter than the other
Herculean Dragon figures. He came with a
great uniform and all of the appropriate accessories (headphones, throat mic, etc). I also
picked up a second Dragon figure to be the gunner.
I forget what figure this is (he's at the far right in this pic -- if you know what figure he is, LMK in the Sandbox), but he came with some great coveralls in
addition to his black tanker uniform.
The black tanker coveralls were used to "kitbash"
a loader along with some Cots-type boots and a set of headphones from the junkbox. The loader
figure was "Christian" the snow troop skiier
guy, so he already had gloved hands (appropriate for a loader!). As for the driver, I used a Cotswold
figure. He seemed to be able to get in
and out of the driver's hatch more easily than most figures and I kinda built the spot for him. I ran out of German uniform options at this
point, so I grabbed some black clothing ('Nam Viet Cong, I think... SWAT
perhaps) and gave him a German pistol and junkbox
headphones and he makes a passable driver.
The Loader and Driver both have those clear rubber bands holding on
their headsets. Those softer plastic
headsets don't stay on worth beans. You
have to make do with what you've got , though! If I ever run into a good deal on black
tanker uniforms and better headsets for the Loader and Driver, I'll swap stuff
out so they all look as good as the Commander and Gunner. Until then, these guys will have to do!
Afterthoughts:
I still could do some work on it. The interior could use some Schmeisser racks, a desk-like feature for maps or target
grids (or at least a peg to hang a clipboard on), a radio set to give the
antenna some sort of use, and probably some cup holders (for their wives and/or
girlfriends). I could add some
equipment to the hull also; items such as shovels, picks, backpacks, helmets,
crates, netting, etc, could always come in handy for a front-line anti-tank gun
crew.
Glue was a real problem during this
project. I'd build something only to
find it was a crummy bond a few days later.
It's a bummer to do a lot of head scratching and lining stuff up to
glue... then add more layers of work on top of that... only to find the lowest
level of glue pops apart under the slightest pressure! GRR!!!
I tried Super-Glue, Gorilla Glue, 2-part Epoxy, model airplane glue, and
JB Weld. Of these, I found model the
Gorilla Glue worthless for bonding this thick styrene. Model airplane glue was also worthless. Epoxy was a semi-useful bonding agent, but
after a week or so it would be weak. JB
Weld was great! It held everything -
even dissimilar plastics - and when it dried I could shape it with my Dremel tool just like plastic. I love that stuff! I'm now a JB Weld fan.
I also added a field telephone that I added
as a vehicle intercom, but I forgot to get pics. The "intercom" was actually a
modern Hasbro chemical detector box that I cut the face off and added a scratchbuilt handset.
It lives in a hinged panel on the left ("passenger side") rear
of the vehicle. The idea was that
infantry could grab the intercom to communicate with the crew in a high-noise
environment (like combat). There's also
a plug for the commander to plug in an extension cord so he can stand on a
nearby hillock or reinforcement with binoculars to recon the way ahead and
still communicate to the crew over the intercom. It could also be useful for the commander to
correct indirect-fire. Those might be
groovy pics.
If I ever get around to it, I'll get some pics
of the intercom and add 'em to this site. I doubt I'll get around to it in view of all
the other projects in the hopper, but y'never
know.
Hopes
for the future:

 It'd be great if 21st Century would put
out more of these affordable R/C vehicles.
Vehicles like the Carro-Armato M.14/41 at left
or the Semoventa at right would rock!
It'd be great if 21st Century would put
out more of these affordable R/C vehicles.
Vehicles like the Carro-Armato M.14/41 at left
or the Semoventa at right would rock!
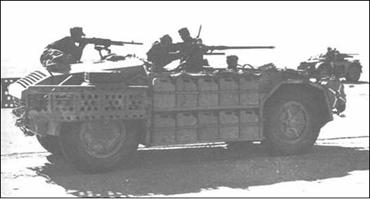 A desert-prowling Sahariano
(Saharina?) would be a cool one... they could use the
HummVee R/c guts for
A desert-prowling Sahariano
(Saharina?) would be a cool one... they could use the
HummVee R/c guts for 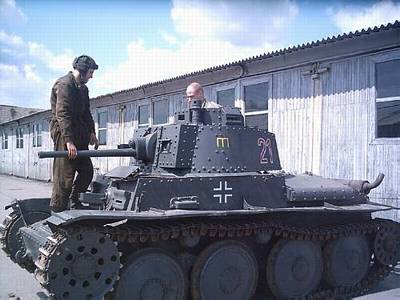 this one!
A PzKw
38t (right) would be my hands-down #1 choice, though… it's small, like the M5
Stuart, and could use the same "innards", thus should be easy to
manufacture. It's sized right for combat
with the M5 Stuart and the chassis could be used for a host of other weapon
platforms, too!
Dreaming is free...
I hope you enjoyed looking over my little
project. Now it's ready to patrol the
back yard and do battle with allied Joe forces for control of the
backyard. Today the German SPAT 75mm
will seize control of the patio, then they will move
toward domination of the whole backyard… and tomorrow -- THE WORLD!
Click the logo to go home ![]()
NOTE:
if you wish to contact me regarding anything on this site, the Sandbox
newsgroup is the best way (alt.toys.gijoe).
When I had a functioning email link on my pages, Spambots
practically demolished the usefulness of my email account.